Ad
Ad
Ad
Author

admin

Browsing

In this article, we will try to Cover all the certifications in Marketing Cloud. Salesforce has introduced two new Certifications for Marketing Cloud in 2019 apart from the existing two certifications.

Certifications:

  1. Marketing Cloud Administrator: This is the latest certification that was introduced in Nov 2019 and this certification tests the overall knowledge of the features available to end-users and configuration options available in Marketing Cloud. We Should be able to respond to common business requirements and perform Administrative functions within Marketing cloud in accordance with digital marketing best practices.

Prerequisite: This is a stand-alone certification and does not have any new pre-requisite.

Exam fee: 200 USD

Retake fee: 100 USD

Passing score: 67 percent

Time: 105 minutes

Content: 60 multiple choice/Multi select questions

Exam introduced in Nov 2019

Delivery options: Onsite/Online

Exam guide: https://trailhead.salesforce.com/help?article=Salesforce-Certified-Marketing-Cloud-Administrator-Exam-Guide

  1. Marketing Cloud Developer: This certification was launched in May 2019 and will assess important development concepts such as AMP Script, SSJS, Data extensions, Import activities, data modeling, and Security. This exam also tests our understanding of important concepts such as Key management types, encryption functions, and required permissions for API,etc.

Prerequisite: We have to hold an active Marketing cloud Email specialist before taking this exam.

Exam fee: 200 USD

Retake fee: 100 USD

Passing score: 63 percent

Time: 105 minutes

Content: 60 multiple choice/Multi select questions

Exam introduced in May 2019 at TrailheadDX

Delivery options: Onsite/Online

Exam guide: https://trailhead.salesforce.com/help?article=Salesforce-Certified-Marketing-Cloud-Developer-Exam-Guide

  1. Marketing Cloud Consultant: This certification tests the candidates ability to Configure and implement tools effectively in Marketing cloud. This exam also tests the candidate’s ability to provide solutions in executing both tactical and Strategic email Campaigns. This exam is mostly designed for consultants who have hands-on experience implementing Email Studio, Journey Builder, Automation Studio, Content builder, Contact Builder, and Marketing Cloud Connect.

Prerequisite: We have to hold an active Marketing cloud Email specialist before taking this exam.

Exam fee: 200 USD

Retake fee: 100 USD

Passing score: 68 percent

Time: 105 minutes

Content: 60 multiple choice/Multi select questions

Exam introduced in May 2019 at TrailheadDX

Delivery options: Onsite/Online

Exam guide: https://trailhead.salesforce.com/help?article=Salesforce-Certified-Marketing-Cloud-Consultant-Exam-Guide#about

  1. Marketing Cloud Email Specialist: This is the base certification of all the certifications and tests the candidates ability to demonstrate their knowledge, skills, and experience using a Marketing cloud for message design, subscriber and data management, inbox delivery, and external integrations. We should have a good understanding of utilizing a content systems, segmentation, automation, tracking, and analytics to make data-driven decisions to optimize email campaigns.

Prerequisite: This is a stand-alone certification and does not have any new pre-requisite. This exam is pre-requisite for other certifications such as a Marketing cloud Consultant and Marketing cloud Developer.

Exam fee: 200 USD

Retake fee: 100 USD

Passing score: 65 percent

Time: 90 minutes

Content: 60 multiple choice/Multi select questions

Exam introduced in May 2019 at TrailheadDX

Delivery options: Onsite/OnlineExam guide: https://trailhead.salesforce.com/help?article=Salesforce-Certified-Marketing-Cloud-Consultant-Exam-Guide#about

 Journey builder Business Usecases and Navigation in Marketing Cloud

In this article, we will try to understand the Journey builder and different use cases around it. Journey builder helps to define  1 to 1 relationship or personalized Customer/Prospect Journey using multiple channels such as Email, Mobile, PhysicalMail/Direct Mail, and Social Media.

Journey builder Advantages:

  1. We could use the Journey builder to send personalized Emails from Marketing Cloud
  2. We could also connect to the Sales cloud/Service cloud using Journey builder with help of Marketing Cloud Connect.
  3. We could define a customer journey to send Mobile Messages/Push notifications when a customer doesn’t respond to Emails. Additional licence cost is required for Mobile studio.
  4. We could use a journey builder if we want to define multiple touchpoints across the customer journey.

Welcome Email Series for Customer at Costco Use Case:

We could use the Journey builder as part of the Welcome Series and Send multiple emails to customers based on their Journey Path. For example, when a Customer Purchases a new membership at Costco send the first Email Welcoming the Customer to Costco on the day he purchased his membership. Send the Second Email a week later explaining the benefits of Online purchases/Instore promotions that they could use. To encourage customers to visit to the Store send a third email in the third week with an Instore coupon to encourage the purchase. We could also ask them for feedback in week 5 by sending the fourth Email.

Send a 10 percent coupon based on Abandon cart: 

    We could utilize Journey builder to Send 10 percent off coupon to the customer/prospect who has abandoned his or her cart. For this, we could use an API event to get the real time data from the Website/e-commerce site and Send an Email with Cart Reminder to the customer. If the customer does not respond within a day we can send a10 percent off coupon to the customer which could help in Increasing Sales.

Navigation:  

Log in to Marketing cloud and Navigate and click on Journey Builder tab and Select Journey builder.

We can create a Journey by clicking on create a new Journey button at top right-hand corner.

We can create a Single Send Journey or Multi-Step Journey by selecting the desired journey.

Click on Build in Multi-Step Journey and it will take you to the below screen.

Entry Source:

We could select desired Entry point such as Data Extension or use API Event or Salesforce Data or Event or Cloud Pages with Journey or Customer/Prospect Data.

Flow Control:

 We could use different wait conditions or decision splits to send customers on different paths.

Activities:

The power of journey builder lies with its delivery using multi-channels. We could use Push Notification/Inbox/Line message/In-App Message/SMS/Email.

 Understanding Wait Activity Attributes in Journey Builder

In this article, we will try to understand different Wait Activity attributes in Journey builder. Journey builder helps to define  1 to 1 relationship or personalized Customer/Prospect Journey using multiple channels such as Email, Mobile, PhysicalMail/Direct Mail, and Social Media.

Wait Activity is a configurable period that contacts are held between other Activities. During Wait Activity, Marketing cloud evaluates marketing cloud Contacts. We have to configure the time zone for the Wait Activities.

There are 3 different types of Wait Activities

  1. Wait by Duration
  2. Wait Until Date
  3. Wait by Attribute

Wait by Duration: This is the default wait activity that is displayed on the Canvas with the duration as 1 day. We Could increase the Wait duration to desired Days/Weeks/Months. Optionally we could also specify a time to make the Marketing contacts wait until the desired time by selecting “Extend Wait duration until specific time”.

Wait Until Date: Marketing cloud Contacts are held in the wait mode until the Specified date and time. Note: If the Contact reaches the wait activity after the specified date and time then the contact proceeds to the next activity Immediately.

Wait By Attribute: Marketing Cloud Contacts are held until the day and time specified on date attributes. For example, if we want to send a Birthday Email to the Customers/Contacts we could use the Wait By attribute with the date attribute field as Customer Birthdate field which stores customer birthday.

 Lightning Web Component series: Common Errors While Installing VS Code

In this article, we will discuss the common errors that are encountered while installing VS Code. There are two steps involved before starting with your first Lightning Web component.

  1. Installing CLI
  2. Download Salesforce CLI using the appropriate link for your operating system:

Operating System

Link to Installer

macOS

https://sfdc.co/sfdx_cli_osx

Windows 32-bit

https://sfdc.co/sfdx_cli_win

Windows 64-bit

https://sfdc.co/sfdx_cli_win64

Debian/Ubuntu 64

https://sfdc.co/sfdx_cli_linux

Download the archive from one of the URLs in the manifest, extract the archive, then run the ./install script.

Debian/Ubuntu x86

https://sfdc.co/sfdx_cli_linux_x86

Download the archive from one of the URLs in the manifest, extract the archive, then run the ./install script.

  1. Run the Installer and open a command line prompt, such as cmd on windows or Linux or Terminal on macOS.
  2. Run sfdx plugins –core in command line prompt to confirm the installation.

2. Installing VS Code

You could use the link below to install VS Code in your machine.

https://code.visualstudio.com/

 There is an exclusive trailhead with the Installation steps.

 Common Errors:

  1. Error: Incompatible Java version(Java 8 or more recent is required to run. Please

download and install a recent JDK).

Install latest version of jdk by checking any of the below links

https://www.oracle.com/java/technologies/javase-jdk13-downloads.html

https://www.azul.com/downloads/zulu-community/

  1. Error: Salesforce CLI is Not Installed

This is one of the most common errors that most of the user encounters. This could happen because of a couple of reasons.

  1. You might have missed the installation of Salesforce CLI. If so go back and install Salesforce CLI. You can refer the first section of the article for the steps
  2. You might have installed 32-bit version of Salesforce CLI and trying to install a 64-bit version of VS Code. Uninstall 32-bit version of Salesforce CLI and install a 64-bit version of Salesforce CLI. Once the 64-bit Salesforce CLI is installed then go ahead and install a 64-bit version of VS Code.
  3. If you still see the issue after doing the first two steps then check the Path to make sure “Salesforce CLI” is setup in the path.

Go to Window Search–> Type Environment variables–> Open

3. Error:  deploying or retrieving source

The file or directory that you tried to deploy or retrieve isn’t in a package directory that’s specified in your sfdx-project.json file. Add this location to your “packageDirectories” value, or deploy or retrieve a different file or directory. For details about sfdx-project.json

This type of error occurs when we do not specify a folder name when we are creating a new project using vscode. To resolve this error create a new folder and use the same folder in VS Code.

4. Error: Unable to load the schema from ‘https://forcedotcom.github.io/schemas/sfdx-project.json/sfdx-project.schema.json’: unable to verify the first certificate.

In order to resolve this error go to your project folder in vs code and select config and replace project-scratch-def.json file with the below code from Github

https://github.com/forcedotcom/schemas/blob/master/sfdx-project.json/sfdx-project.schema.json

Please comment on any other errors in the Comment Section below. I will add it to this list so that other members of the community can benefit from your knowledge.

In this article, we will try to understand the basics of AmpScript and insert records into Sales cloud. In our previous article, we learned how to personalize using Ampscript. Ampscript code starts with %% and ends with %%. For example, if we wanted to get the dynamic value of Email from Data extension we can use %%Email%% on the Email template or on the cloud page. In case of Cloud page if we want to write an ampScript block then it starts with %%[ and ends with ]%%.

%%[  

/** Start of Variable Declarations **/

var @newFirstName,@newLastName,@newEmail,@newPhone ,@website,@Submit

/** End of Variable Declarations **/

/** Start of Setting Dynamic/static values to desired variables **/

set @newFirstName = RequestParameter(“Firstname”)

set @newLastName = RequestParameter(“Lastname”)

set @newEmail = RequestParameter(“email”)

set @newPhone = RequestParameter(“phone”)

set @website = ‘Home Page’

set @Submit = RequestParameter(‘submit’)

/** End of Setting Dynamic/static values to desired variables **/

/** Validate if the variable has got the desired value before inserting into Data extension **/

If @submit == ‘Submit’ Then

CreateSalesforceObject(“Contact”,3,”Email”, @emailAddress, “FirstName”, @newFirstName,”LastName”, @newLastName,”Phone”,@newPhone)

Endif

]%%

<label>Name:</label> <input name=”Firstname” type=”text” value=”%%FirstName%%” />

<label>Name:</label> <input name=”Lastname” type=”text” value=”%%LastName%%” />

<label>Email:</label> <input name=”email” type=”text” value=”%%email%%” />

<label>Phone:</label> <input name=”phone” type=”number” value=”%%phone%%” />

<input name=”submit” type=”submit” value=”Submit” />

In the above code snippet, we have started our ampscript code with %%[ and then we declared variables using var keyword. Every variable must be declared/starts with @. We have declared newName, newEmail, newPhone for demo purposes.

var @newFirstName,@newLastName,@newEmail,@newPhone,@website,@Submit

After declaring the variables the next step is to populate the variables with some values. We can set any value to the variable as it can hold text or numbers. In our scenario, we want to collect all the dynamic values such as name, email, phone and submit from the form which the customer has entered.  RequestParameter function in Ampscript helps in getting dynamic values from the form.

set @newFirstName = RequestParameter(“Firstname”)

set @newLastName = RequestParameter(“Lastname”)

set @newEmail = RequestParameter(“email”)

set @newPhone = RequestParameter(“phone”)

set @website = ‘Home Page’

set @Submit = RequestParameter(‘submit’)

After the Declaration of variables and setting/getting the values into variables, our next step is to use the variables and send them to Sales cloud/Service Cloud.

We always have to do conditional based logic to avoid unnecessary calls/errors to data extensions. To implement conditional logic we can use If condition/If else condition similar to other programming/Scripting languages. The syntax is a little different when compared to other programming/Scripting languages.

If (condition is true) Then

do this

Endif

In our scenario, we are checking if @submit variable is populated with value as submit then insert into Sales cloud/Service cloud.

If @submit == ‘Submit’ Then

CreateSalesforceObject(“Contact”,3,”Email”, @emailAddress, “FirstName”, @newFirstName,”LastName”, @newLastName,”Phone”,@newPhone)

Endif

 Block users from Logging into Salesforce during Deployments

In this post, We will try to understand how to stop users from logging into Salesforce when deployments are going on. Have you ever wondered how salesforce displays a maintenance message to users? The answer to this question is Salesforce uses Login flows to display message to users. Lets see how we could use Login flows, Flows and Custom settings(Hierarchical) together to stop users from Logging into Salesforce during deployments.

Step 1: Creation of Custom settings

Create Custom settings with the desired name and for our demo purpose, we will call it Block users from Login. We need to create two fields (BlockUser and DisplayMessage) on the “Block users from Login” custom settings. Block user field will be a checkbox and the Display Message will be a text area field. If the checkbox is selected then the desired message from the Display Message field should be displayed to the users

Step 2: Creation of flow

Create a flow with the desired name. For demo purposes, we will call it as “Block users from Login Service”.

Get Records: From Left side, pane select Get records and drop it on to the main page. In this step, we are trying to get the records from our custom settings(Block users from Login) as shown in the image. Fill in all the mandatory fields and select the first record

Object – Block users from Login

Condition Requirements — Get all Block users from Login

Sort Order – Not Sort

How many records to store – only the first record

How to store the record data – Choose fields and assign Variables (Advanced)

Select Variable to Store Block users from Login

Record – {!blockusers}

Field – BlockUser__c

Field – DisplayMessage__c

After entering all the above information click on Done. With this activity, we have successfully created Get Records.

In the next step, we will try to check if the Block user field on the fetched Custom setting(Block users from Login) is set to true using the decision box.

Decision:: Drag and drop Decision box from Left palette onto the Main page.Enter the desired Label and API Name. In the outcome, order click on + and enter the below details. Give the desired Label and API Name and set the When to execute Outcome as “All conditions are Met”. In the Resource select the blockuser field as true using the Global constant field. Click on Save and connect Get Records with decision box.

Screen: From the Left palette select the Screen and drop it on the main page. Give the desired screen name on the Label/API Name in the Screen properties. In the configure frame select “Show Header” only.

Note: Make sure you unselect the “Show footer” or else users will be able to see a button and then navigate/login to salesforce.

Our end result of the flow should be as shown below and make sure you go back and activate your flow.

Login flows:

Create new Login flow with desired name and select the flow we have created(Block_users_from_Login_Service).  Select userlicense as Salesforce and set the desired profile that we want to block the users from Logging in. In my scenario, I wanted to block Users with Standard User profile from logging into Salesforce.

Testing:

Login with any  Standard profile user and we should be able to see the information message from our custom settings and stop users from navigating into salesforce.

Note: Once the deployment/Maintenance is complete make sure to uncheck the Blockuser__c field to allow users into salesforce

In this article, We will try to understand the difference between Quick Action, Publisher Action and Global Actions in Salesforce.

Quick Action:  Quick Action is like a Shortcut that could be used to Log Calls or Create a Record or Share Files on Salesforce Mobile App.

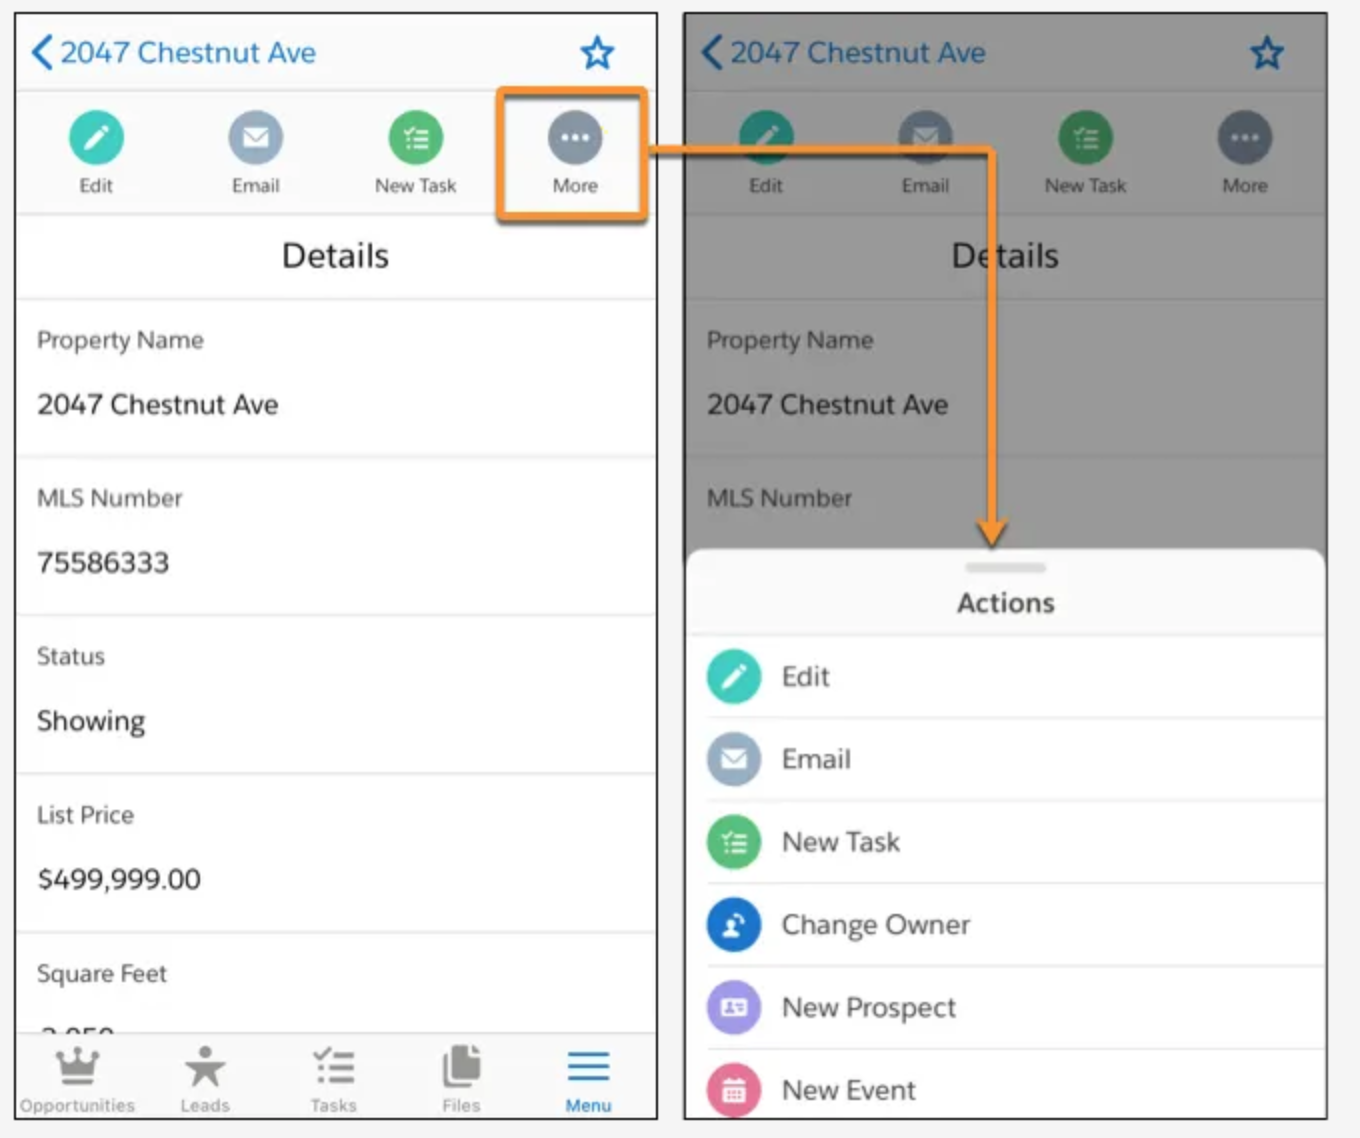
  Quick Actions can help us to prepopulate desired fields as well as provide Unique page Layout to save time for our mobile users. There are two types of Quick Actions

  1. Object Specific Actions
  2. Global Action

Object Specific Actions:

https://trailhead.salesforce.com/en/content/learn/modules/salesforce1_mobile_app/salesforce1_mobile_app_actions_global

 Basic javaScript concepts before deep diving into Lightning Web Components

In this post, We will try to understand Basic Javascript concepts that will help us in learning Lightning Web Components.

1.Case Sensitivity:  If you are coming from World of Salesforce/Apex then the first key thing to remember is JavaScript is Case Sensitive. For Example, the word “Salesforce” and “salesforce” are treated differently in javascript.

2. DOM(Document Object Model) :  Whenever we visit any website page, the browser creates a Document object model for the page. The browser that we use to view the website is a program that interprets HTML and CSS and renders the style, content, and structure into the page that you see. This is constructed/represented as a tree of objects. This DOM could update any element on the page by accessing this document.

3. Variable Declaration: We can use let, var, const for variable declaration in Javascript. Always use let and const for variable declaration. Do remember we can assign objects and functions to variables, unlike other programming languages.

Ex: let myName=’SfdcLightning’; // We can change the value of myName whenever required in the code

let account = new Account(); // We can change the value of Account whenever required in the code

const  value =5; // This value is Permanent and cannot be changed in the code.

const car = new car();//The value of car cannot be changed but we can change the properties inside  the car

4. Functions:  In JavaScript, everything is an Object. Functions can be assigned to variables, passed into parameters of other functions.

function name(parameter1, parameter2, parameter3) {

//Write any code that needs to be executed

}

Ex: var cal = myCalculation(4, 3);  //Cal will give us the value as 12

function myCalculation(a, b) {

return a * b;         // Function returns the product of a and b

}

5.JavaScript Data Types: There are different data types that hold Values/Objects.

There are 5 different  data types that contains values(String/number/boolean/object/function).

There are also 6 types of objects (Object/Date/Array/String/Number/Boolean).

Two datatypes cannot contain values (null/undefined).

6. this keyword: Learn about this keyword as it differs from Apex in salesforce. There are various scenarios and behavior changes of this keyword unlike in apex where it is confined to the current instance of that particular class. Learn more about the use-cases

https://www.w3schools.com/js/js_this.asp

 Reporting Hack:Add Casesafeid field on Salesforce Standard and Custom object

In this post, We will explore the importance of adding Casesafeid and power of 1 fields on standard and custom objects. We download/run reports most of the time for issue Analysis. “Id” field on the report will give us a 15 digit case sensitive value. This 15 digit Id field is not helpful for analysis or comparison and we always end up using an 18 digit Case insensitive field when comparing data with External Systems. In order to solve this issue, most of us try to find ways in converting 15 digit id to 18 digits by using Excel conversion or quick Google search and copy-paste the 18 digit ids for analysis. Salesforce had cameout with a builtin Casesafeid function to solve this issue. We need to add a custom formula field with the desired name on Standard/Custom object with value as Casesafeid(id) which provides us with an 18 digit case-sensitive value. In the below demo we will add casesafeid field on Account Standard Object.

Object Manager–>Account–>Fields & Relationships–>Select formula field with type as Text

Enter the CasesafeId function as shown below in the formulae field and add it to desired page layouts if you want to see the 18 digit field on the layout.

Below is the screenshot of the 18 digit field Added to the Layout

Screenshot of Report with 18 digit id

Helpful tips:

  1. Always create casesafeId field on every standard and custom objects. This will save you time during Analysis and comparison of data from external systems.
  2. 15 digit id is case sensitive and 18 digit is case Insensitive
  3. Provide visibility to desired users to based on Profiles.
  4. You can add this 18 digit field to layout and restrict visibility only to Admins only

 Reporting Hack: Power of 1 a Game Changer in Reports

count down graphjc background for event opening

In this post, We will try to understand the importance of the Power of 1 field on Standard and Custom Objects which helps in Reporting. We could get high-level stats such as Owner Unique Counts, Unique records owned by a User for Parent objects, etc when we use this field in Reports. In the below example, We will create a Formula field on Standard objects such as Account / Opportunity and User and run a report on Opportunity to get the unique Accounts and unique owners.

Business Requirement: Show Unique Account Count based on Owner in an Opportunity report

Setup –> Object Manager–>Account –> Fields & Relationships –> New–>Forumla–>Account(Power of 1). You can give any desired name as the Field Name.

Make sure you set the Decimal Place as 0.

Enter the value as 1 and click on Next and deselect all Page Layout and provide Visibility to desired profiles.

Similarly, Create the Power of 1 field on Opportunity object as well.

Let’s see the power of 1 in action after adding the Power of 1 field on desired objects. We will try to create Opportunities with Products Report type for our demo purpose. I have selected with Opportunities with Products Report type and applied filters such as Created Date(Current FY) and Opportunity Status as Open.

From the above report, I cannot get the Unique count of the Accounts associated with opportunities. This is where Power of 1 field created on the Account record would help us in getting the desired result.

From the above image you could see there are 5 Account records(Duplicate) owned by Gary Smith and 9 Account records(Duplicate) owned by Sai Rakesh Puli. With the help of the Power of 1 formula field, we were able to get the Unique Account records owned by Gary Smith and Sai Rakesh Puli. These stats are very helpful when we want to get unique counts from any objects that we join on the Reports.