In this post, We will try to understand how to switch between Multiple Templates in Lightning Web Components

In this post, We will try to understand how to switch between Multiple Templates in Lightning Web Components
In this post,We will try to understand using Iterator in Lightning Web Components to render Lists/Elements.

In this article, we will try to understand the basics of AmpScript and insert records into Sales cloud. In our previous article, we learned how to personalize using Ampscript. Ampscript code starts with %% and ends with %%. For example, if we wanted to get the dynamic value of Email from Data extension we can use %%Email%% on the Email template or on the cloud page. In case of Cloud page if we want to write an ampScript block then it starts with %%[ and ends with ]%%.
%%[
/** Start of Variable Declarations **/
var @newFirstName,@newLastName,@newEmail,@newPhone ,@website,@Submit
/** End of Variable Declarations **/
/** Start of Setting Dynamic/static values to desired variables **/
set @newFirstName = RequestParameter(“Firstname”)
set @newLastName = RequestParameter(“Lastname”)
set @newEmail = RequestParameter(“email”)
set @newPhone = RequestParameter(“phone”)
set @website = ‘Home Page’
set @Submit = RequestParameter(‘submit’)
/** End of Setting Dynamic/static values to desired variables **/
/** Validate if the variable has got the desired value before inserting into Data extension **/
If @submit == ‘Submit’ Then
CreateSalesforceObject(“Contact”,3,”Email”, @emailAddress, “FirstName”, @newFirstName,”LastName”, @newLastName,”Phone”,@newPhone)
Endif
]%%
<label>Name:</label> <input name=”Firstname” type=”text” value=”%%FirstName%%” />
<label>Name:</label> <input name=”Lastname” type=”text” value=”%%LastName%%” />
<label>Email:</label> <input name=”email” type=”text” value=”%%email%%” />
<label>Phone:</label> <input name=”phone” type=”number” value=”%%phone%%” />
<input name=”submit” type=”submit” value=”Submit” />
In the above code snippet, we have started our ampscript code with %%[ and then we declared variables using var keyword. Every variable must be declared/starts with @. We have declared newName, newEmail, newPhone for demo purposes.
var @newFirstName,@newLastName,@newEmail,@newPhone,@website,@Submit
After declaring the variables the next step is to populate the variables with some values. We can set any value to the variable as it can hold text or numbers. In our scenario, we want to collect all the dynamic values such as name, email, phone and submit from the form which the customer has entered. RequestParameter function in Ampscript helps in getting dynamic values from the form.
set @newFirstName = RequestParameter(“Firstname”)
set @newLastName = RequestParameter(“Lastname”)
set @newEmail = RequestParameter(“email”)
set @newPhone = RequestParameter(“phone”)
set @website = ‘Home Page’
set @Submit = RequestParameter(‘submit’)
After the Declaration of variables and setting/getting the values into variables, our next step is to use the variables and send them to Sales cloud/Service Cloud.
We always have to do conditional based logic to avoid unnecessary calls/errors to data extensions. To implement conditional logic we can use If condition/If else condition similar to other programming/Scripting languages. The syntax is a little different when compared to other programming/Scripting languages.
If (condition is true) Then
do this
Endif
In our scenario, we are checking if @submit variable is populated with value as submit then insert into Sales cloud/Service cloud.
If @submit == ‘Submit’ Then
CreateSalesforceObject(“Contact”,3,”Email”, @emailAddress, “FirstName”, @newFirstName,”LastName”, @newLastName,”Phone”,@newPhone)
Endif
In this post, We will try to understand how to Conditionally render different DOM Elements in Lightning Web Component. The power of Lightning web components comes from its ability to display dynamic or desired DOM Elements based on Conditional directive. Salesforce provides us with two if directives such as <if:true> and < if:false> in order to display desired DOM Element.
Html file(electric.html):
<template>
<div id=”electriccar” if:false={pageload}>
<div>Name: {name}</div>
<div>Description: {description}</div>
</div>
<div id=”regularCar” if:true={pageload}>
<div>Car Type: {cartype}</div>
<div> Mileage:{mileage} </div>
</div>
</template>
JavaScript file(electric.js):: In Javascript file add details for the property and set pageload property as false as shown below.
import { LightningElement } from ‘lwc’;
export default class Electric extends LightningElement {
name = ‘Tesla’;
description = ‘Tesla is an Electric Car.’;
cartype = ‘Regular Car’;
mileage = ’30’;
pageload = false;
}
The above will display the following output as we have set the pageload property as false in javascript. In our HTML file(electric.html) we are comparing if:false directive with pageload property and since the value of false matches on both sides we are conditionally displaying Name and Description fields.
Try it in playground: https://developer.salesforce.com/docs/component-library/tools/playground

In this post, We will try to understand Shadow Dom, and Template before deep diving into LWC. In the earlier post, we discussed the DOM(Document Object Model). You could click on the link(DOM) to understand more about it. Shadow Dom hides implementation details(Encapsulates) and allows it to have its own “Shadow ” DOM tree, that cannot be accessed accidentally from the main Document. Example: If we want to play an Audio or video file we will have controls to either forward the video or backward the video as well as to mute or unmute the sound etc. In order to get the below playback file/player we need to use only one line of code in the html/Javascript.
<audio controls><source src=”horse.mp3″ type=”audio/mpeg”></audio>

If you observe the code, we do not see any speaker or play related functionality. All the details are encapsulated inside a single tag <audio controls> which was implemented using Shadow DOM. When we inspect the page we do not see the details other than audio controls related functionality.
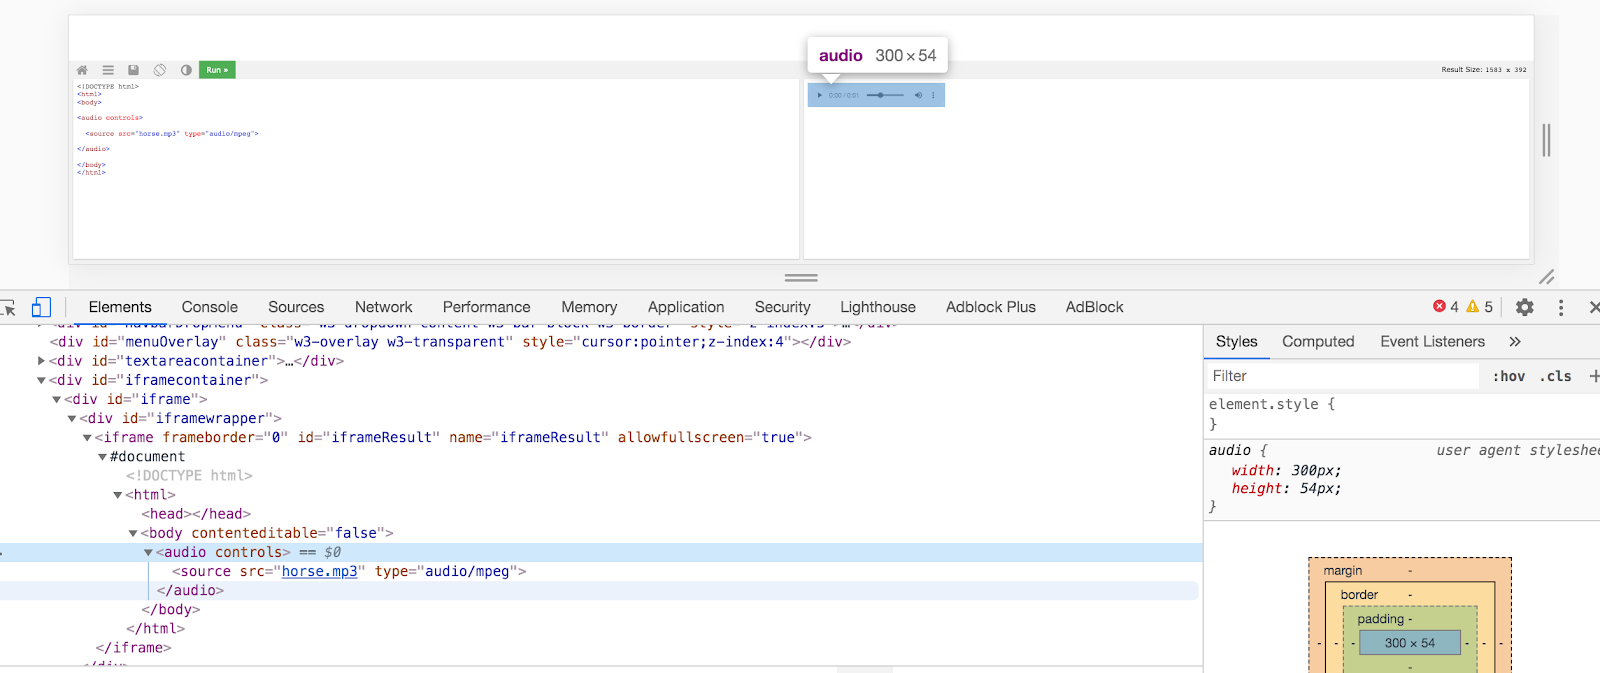
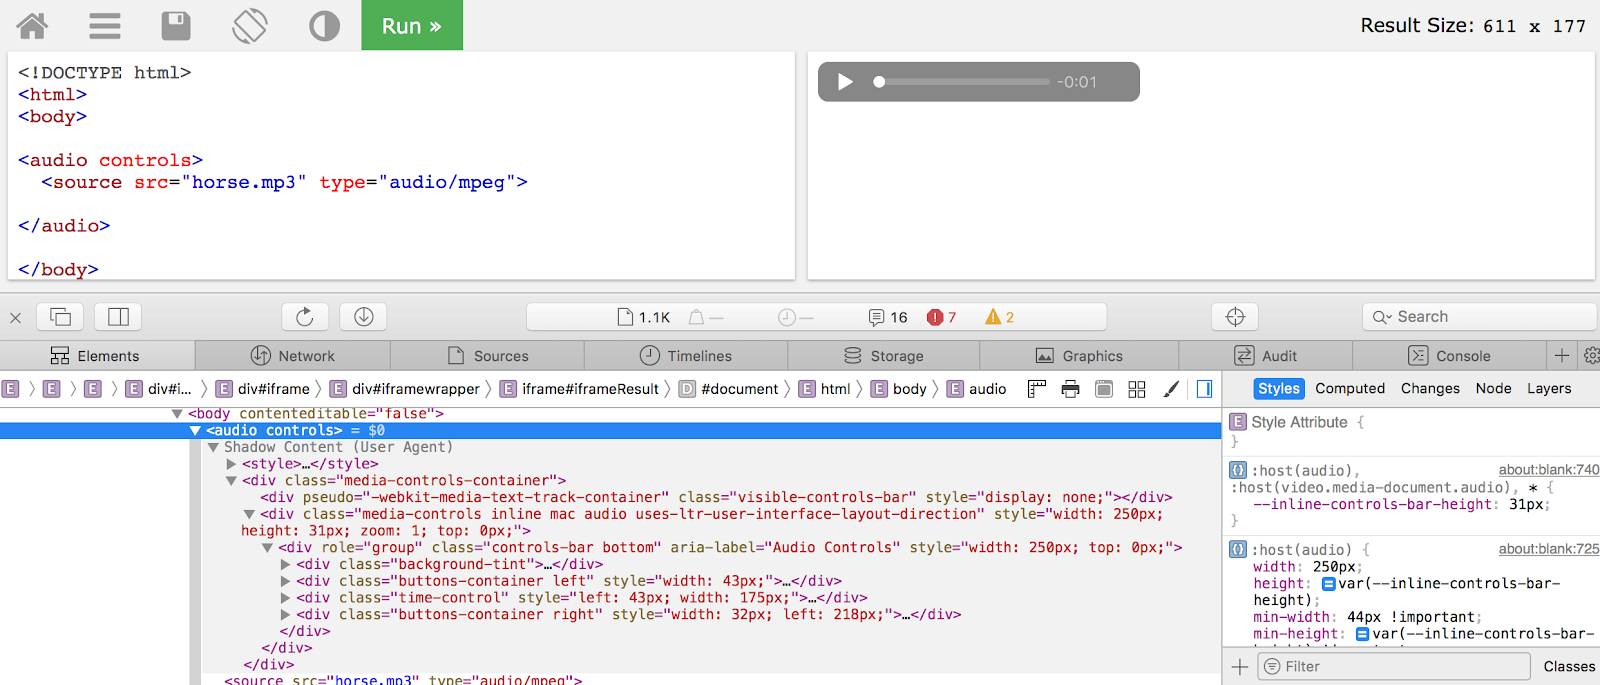
If we enable “Show user agent shadow DOM” then we would be able to see the implementation details. After enabling the setting we are able to buttons/time control under the shadow content.
Structure of shadow DOM:
An element that has a shadow root associated with it is called “shadow host”. The shadow root can be treated as an ordinary DOM element so that we can append arbitrary nodes to it.
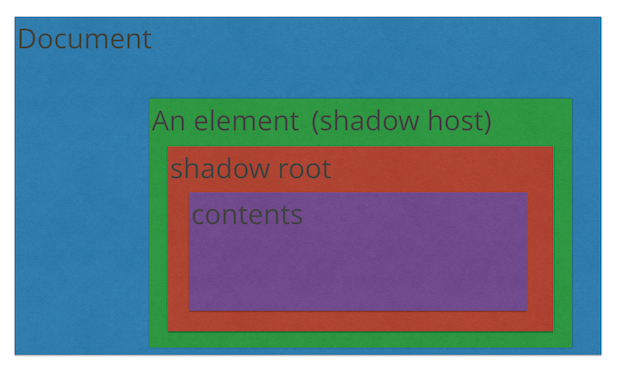
With Shadow DOM, all markup and CSS are scoped to the host element. In other words, CSS styles defined inside a Shadow Root won’t affect its parent document, CSS styles defined outside the Shadow Root won’t affect the main page.
References:
https://www.webcomponents.org/community/articles/introduction-to-shadow-dom

count down graphjc background for event opening
In this post, We will try to understand the importance of the Power of 1 field on Standard and Custom Objects which helps in Reporting. We could get high-level stats such as Owner Unique Counts, Unique records owned by a User for Parent objects, etc when we use this field in Reports. In the below example, We will create a Formula field on Standard objects such as Account / Opportunity and User and run a report on Opportunity to get the unique Accounts and unique owners.
Business Requirement: Show Unique Account Count based on Owner in an Opportunity report
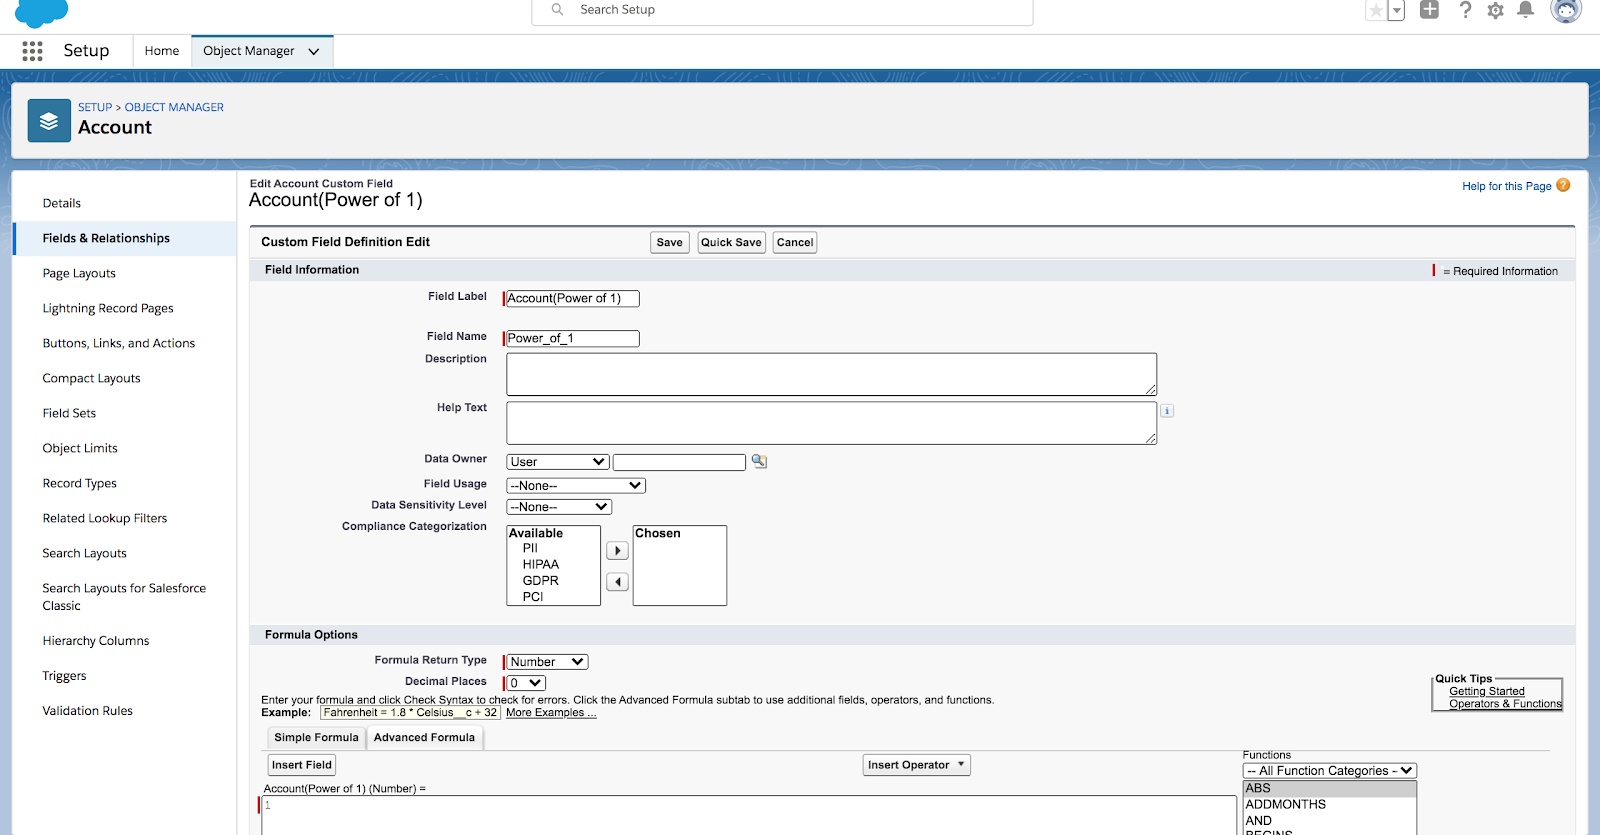
Setup –> Object Manager–>Account –> Fields & Relationships –> New–>Forumla–>Account(Power of 1). You can give any desired name as the Field Name.
Make sure you set the Decimal Place as 0.
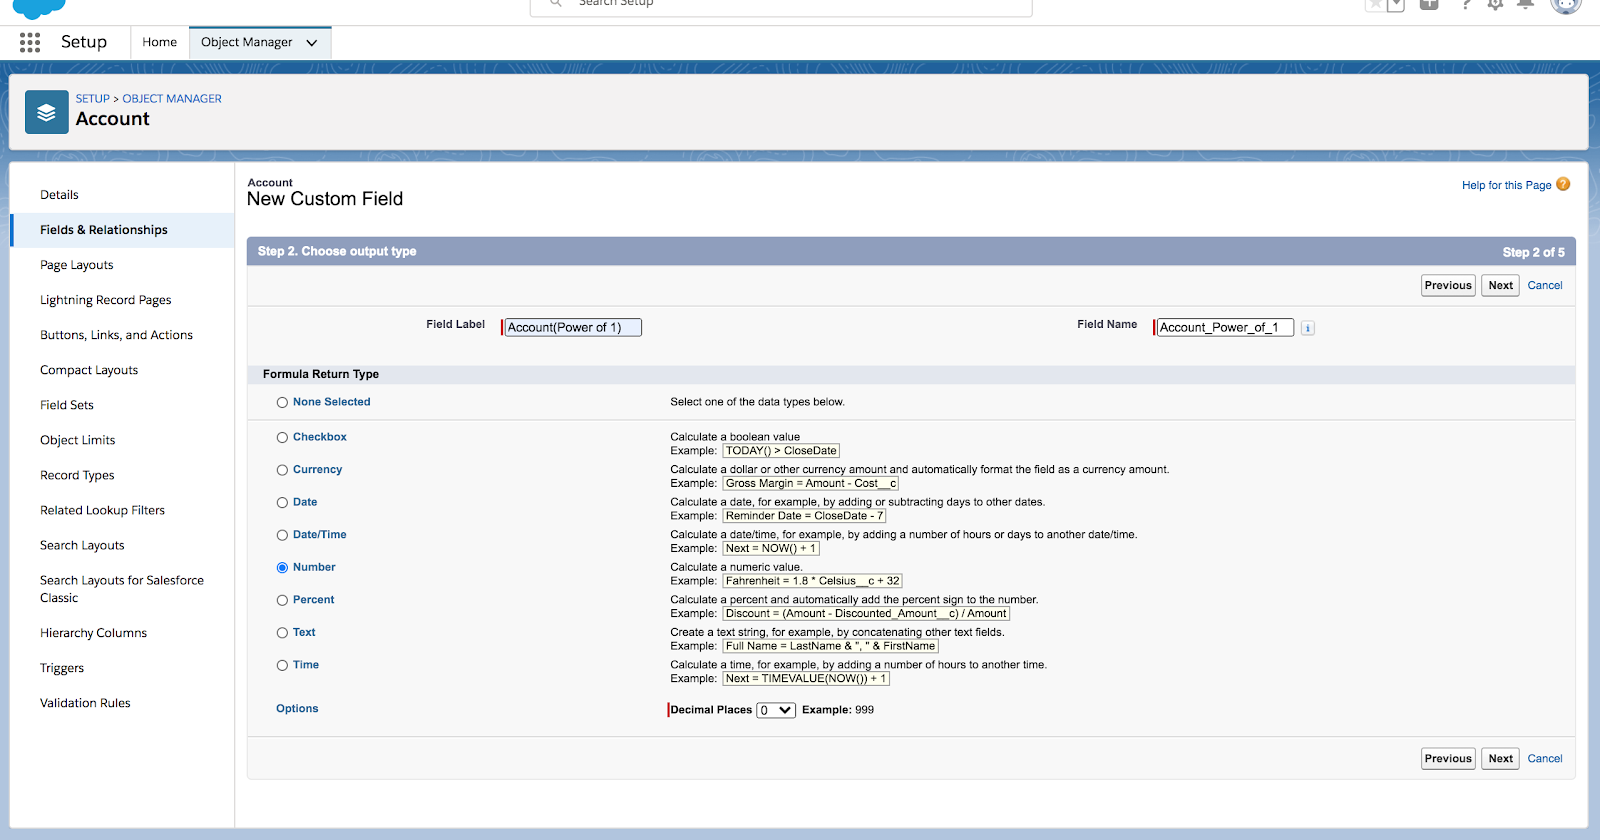
Enter the value as 1 and click on Next and deselect all Page Layout and provide Visibility to desired profiles.
Similarly, Create the Power of 1 field on Opportunity object as well.
Let’s see the power of 1 in action after adding the Power of 1 field on desired objects. We will try to create Opportunities with Products Report type for our demo purpose. I have selected with Opportunities with Products Report type and applied filters such as Created Date(Current FY) and Opportunity Status as Open.
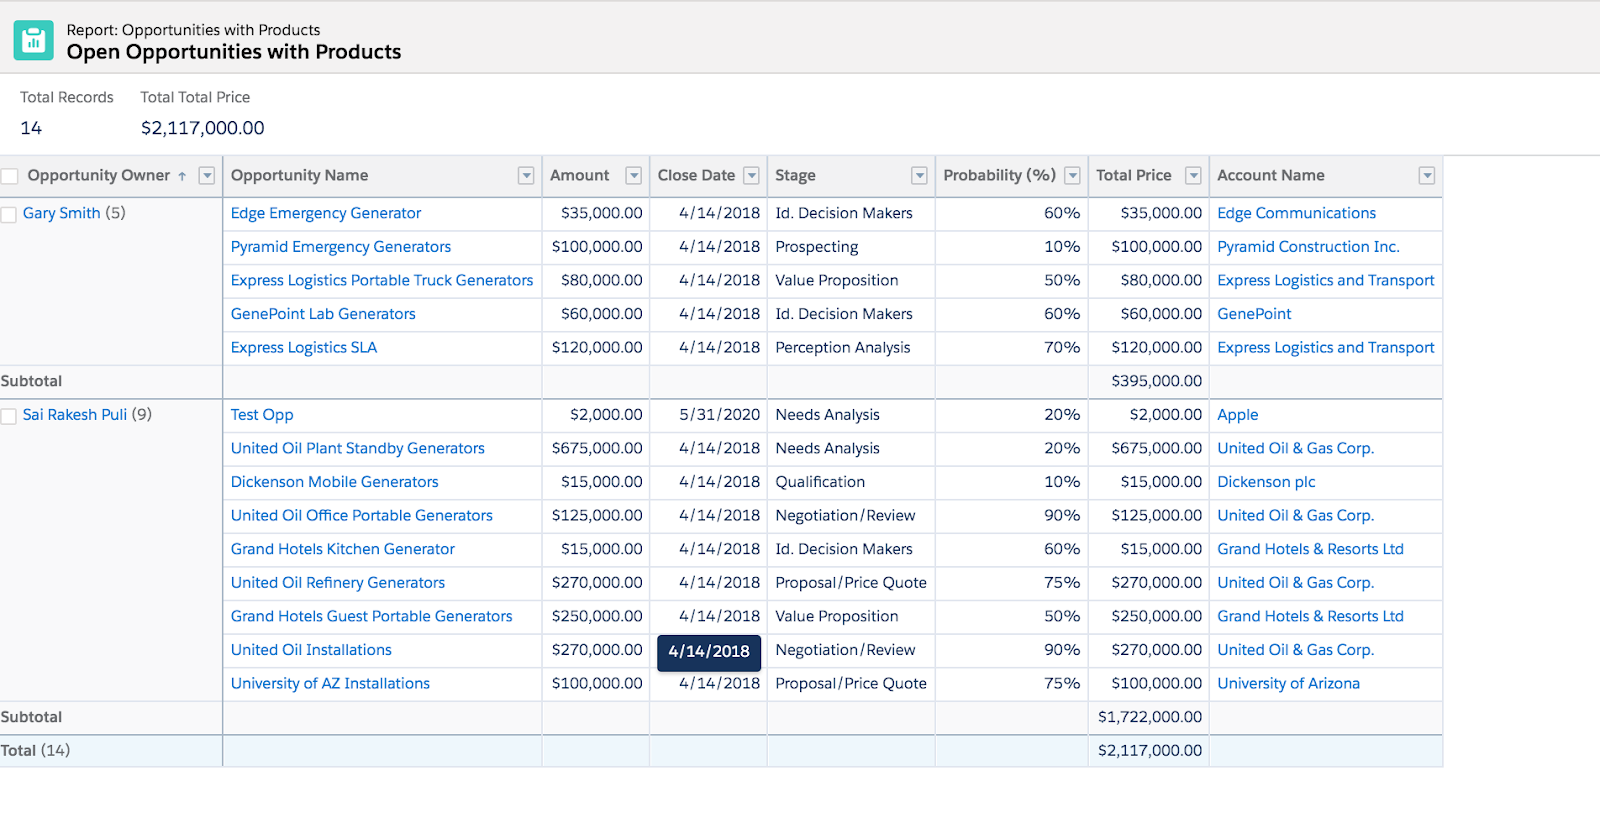
From the above report, I cannot get the Unique count of the Accounts associated with opportunities. This is where Power of 1 field created on the Account record would help us in getting the desired result.

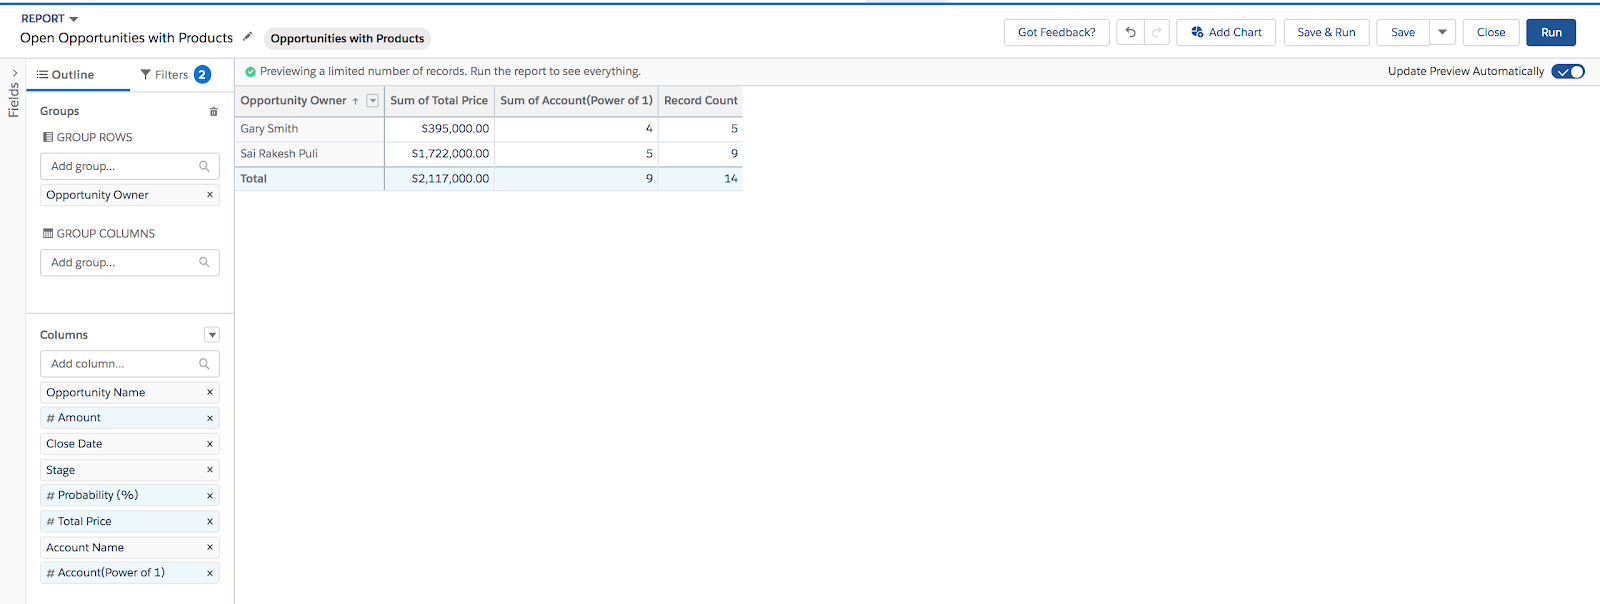
From the above image you could see there are 5 Account records(Duplicate) owned by Gary Smith and 9 Account records(Duplicate) owned by Sai Rakesh Puli. With the help of the Power of 1 formula field, we were able to get the Unique Account records owned by Gary Smith and Sai Rakesh Puli. These stats are very helpful when we want to get unique counts from any objects that we join on the Reports.

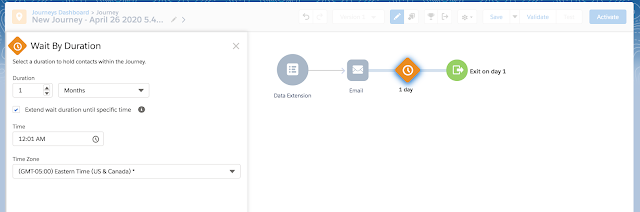
In this article, we will try to understand different Wait Activity attributes in Journey builder. Journey builder helps to define 1 to 1 relationship or personalized Customer/Prospect Journey using multiple channels such as Email, Mobile, PhysicalMail/Direct Mail, and Social Media.
Wait Activity is a configurable period that contacts are held between other Activities. During Wait Activity, Marketing cloud evaluates marketing cloud Contacts. We have to configure the time zone for the Wait Activities.
There are 3 different types of Wait Activities
Wait by Duration: This is the default wait activity that is displayed on the Canvas with the duration as 1 day. We Could increase the Wait duration to desired Days/Weeks/Months. Optionally we could also specify a time to make the Marketing contacts wait until the desired time by selecting “Extend Wait duration until specific time”.

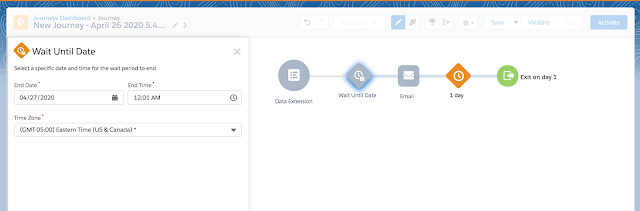
Wait Until Date: Marketing cloud Contacts are held in the wait mode until the Specified date and time. Note: If the Contact reaches the wait activity after the specified date and time then the contact proceeds to the next activity Immediately.
Wait By Attribute: Marketing Cloud Contacts are held until the day and time specified on date attributes. For example, if we want to send a Birthday Email to the Customers/Contacts we could use the Wait By attribute with the date attribute field as Customer Birthdate field which stores customer birthday.

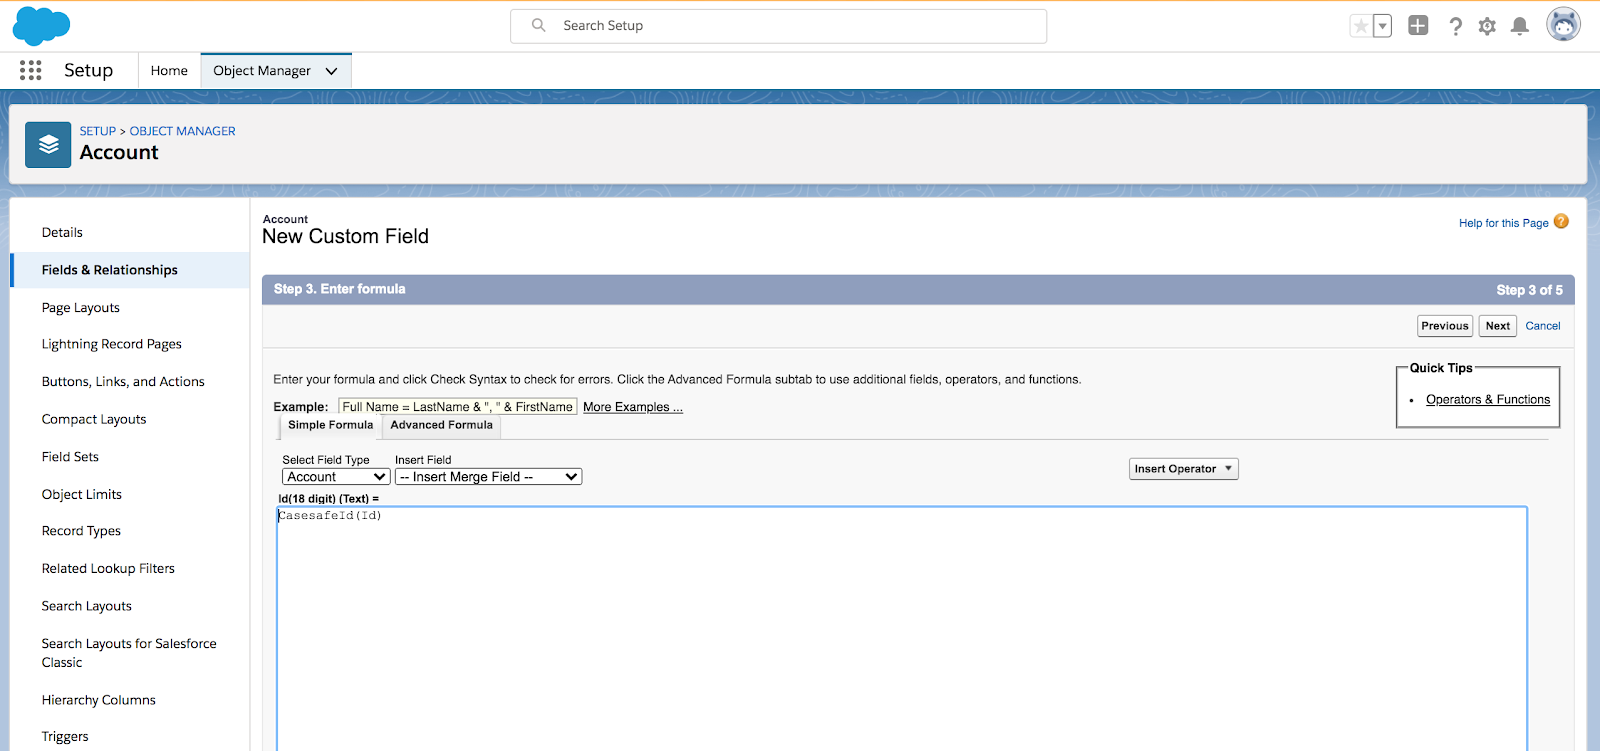
In this post, We will explore the importance of adding Casesafeid and power of 1 fields on standard and custom objects. We download/run reports most of the time for issue Analysis. “Id” field on the report will give us a 15 digit case sensitive value. This 15 digit Id field is not helpful for analysis or comparison and we always end up using an 18 digit Case insensitive field when comparing data with External Systems. In order to solve this issue, most of us try to find ways in converting 15 digit id to 18 digits by using Excel conversion or quick Google search and copy-paste the 18 digit ids for analysis. Salesforce had cameout with a builtin Casesafeid function to solve this issue. We need to add a custom formula field with the desired name on Standard/Custom object with value as Casesafeid(id) which provides us with an 18 digit case-sensitive value. In the below demo we will add casesafeid field on Account Standard Object.
Object Manager–>Account–>Fields & Relationships–>Select formula field with type as Text
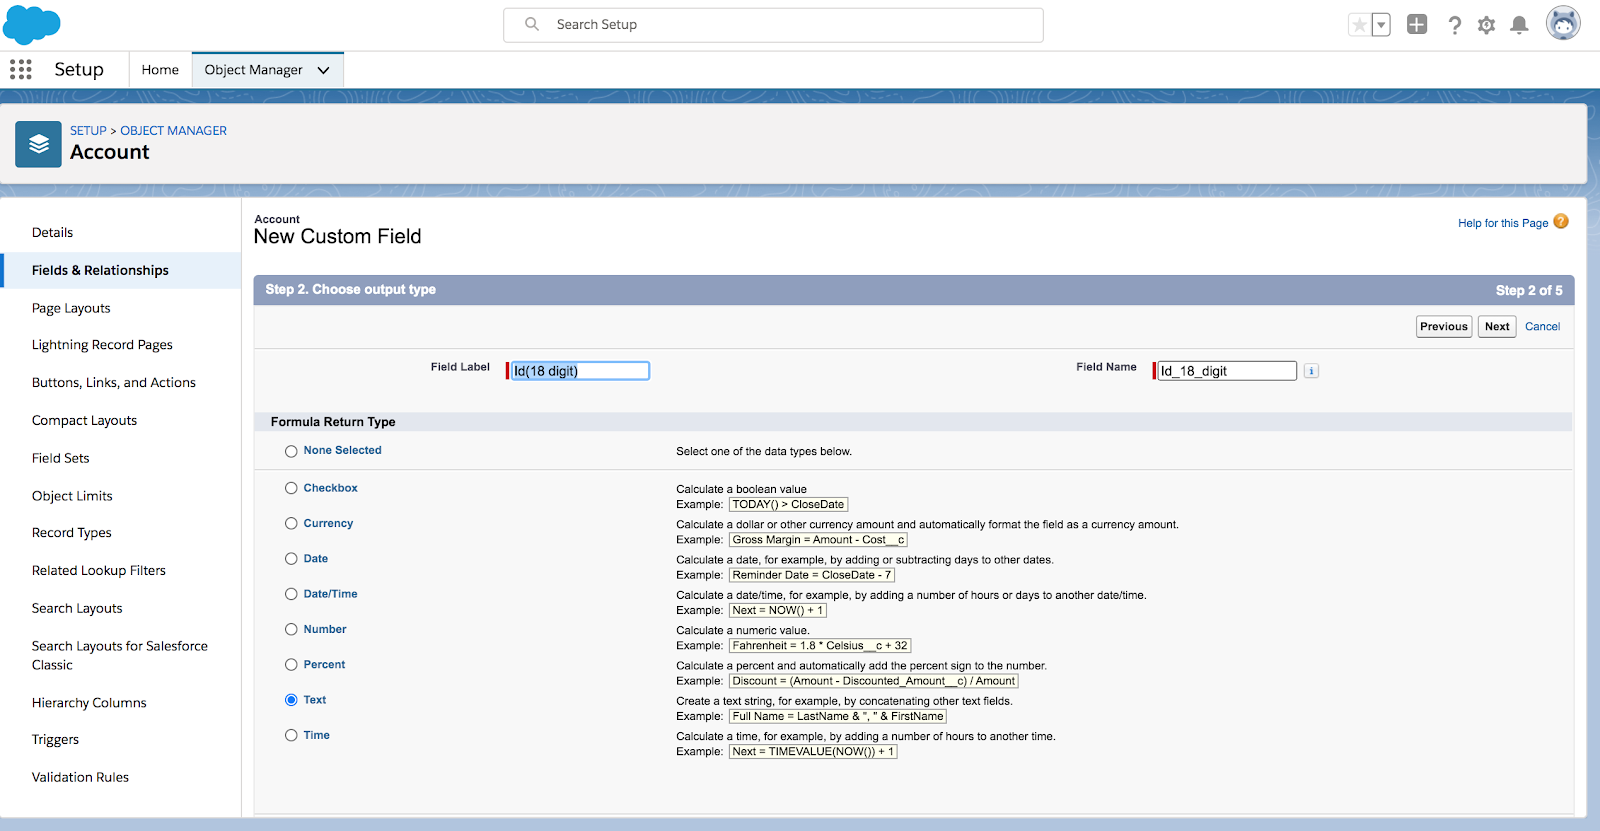
Enter the CasesafeId function as shown below in the formulae field and add it to desired page layouts if you want to see the 18 digit field on the layout.
Below is the screenshot of the 18 digit field Added to the Layout
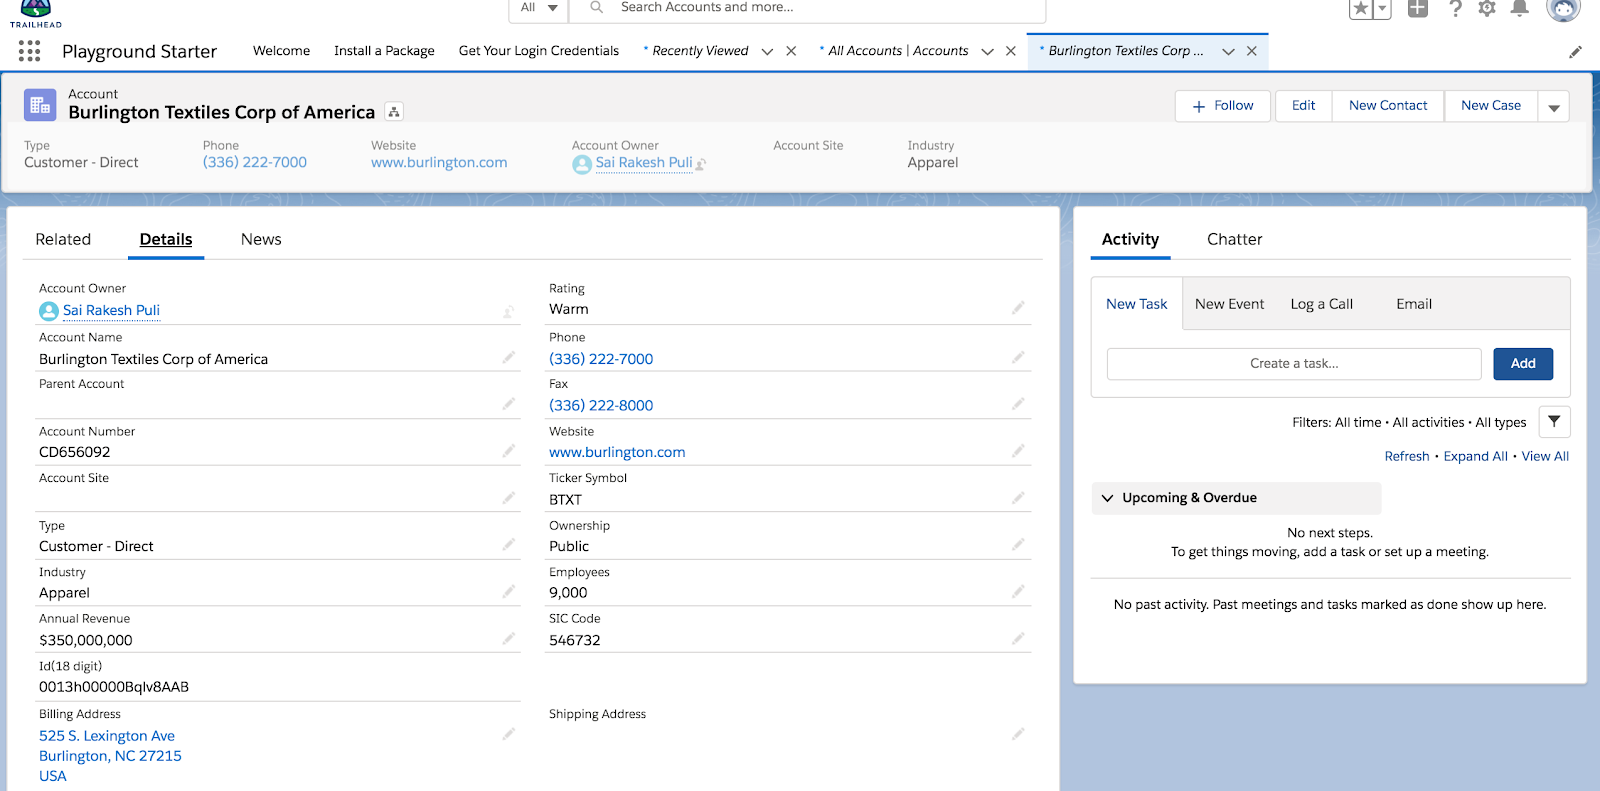
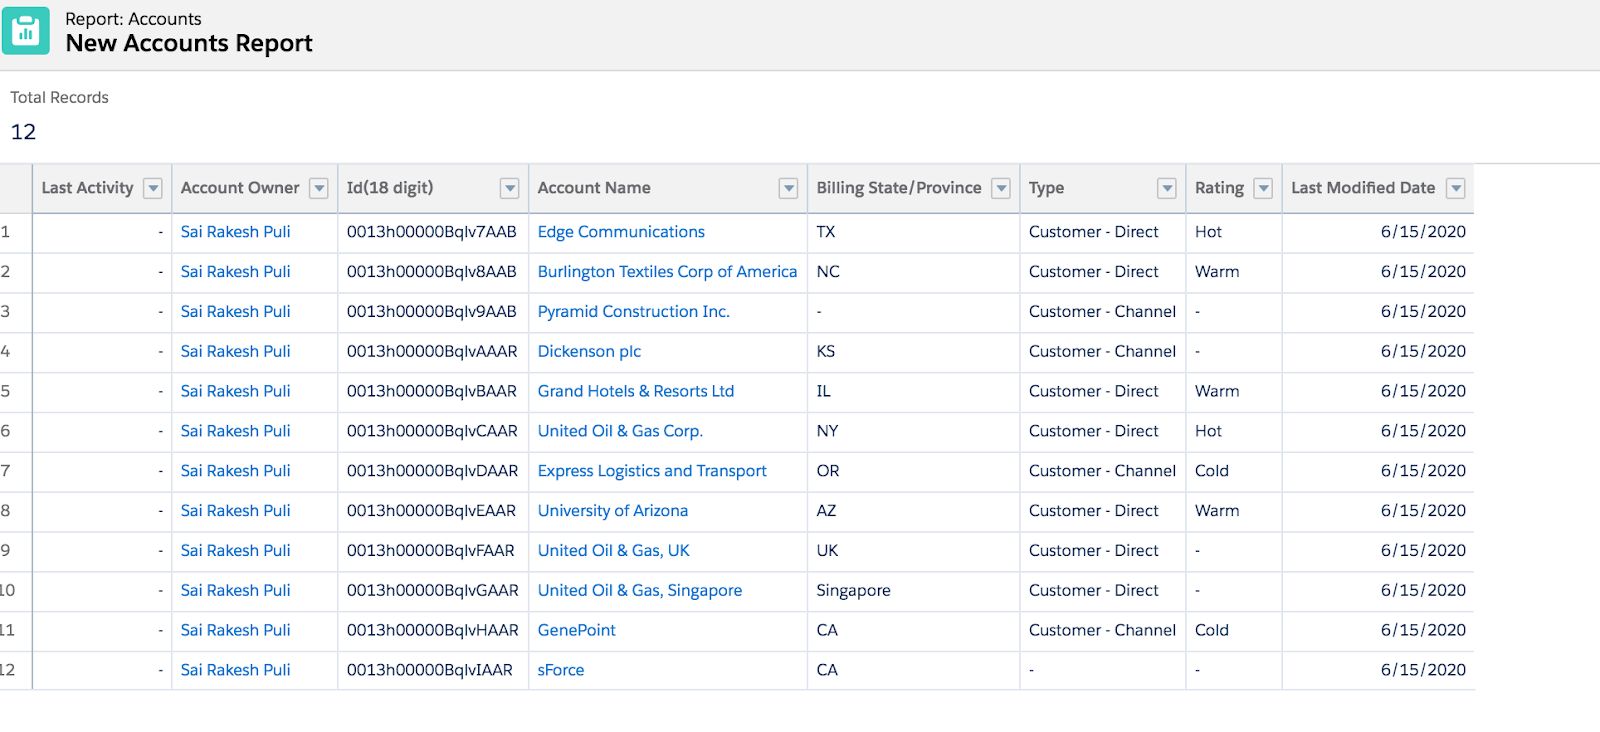
Screenshot of Report with 18 digit id

Helpful tips:
In this post, We will try to understand Basic Javascript concepts that will help us in learning Lightning Web Components.
1.Case Sensitivity: If you are coming from World of Salesforce/Apex then the first key thing to remember is JavaScript is Case Sensitive. For Example, the word “Salesforce” and “salesforce” are treated differently in javascript.
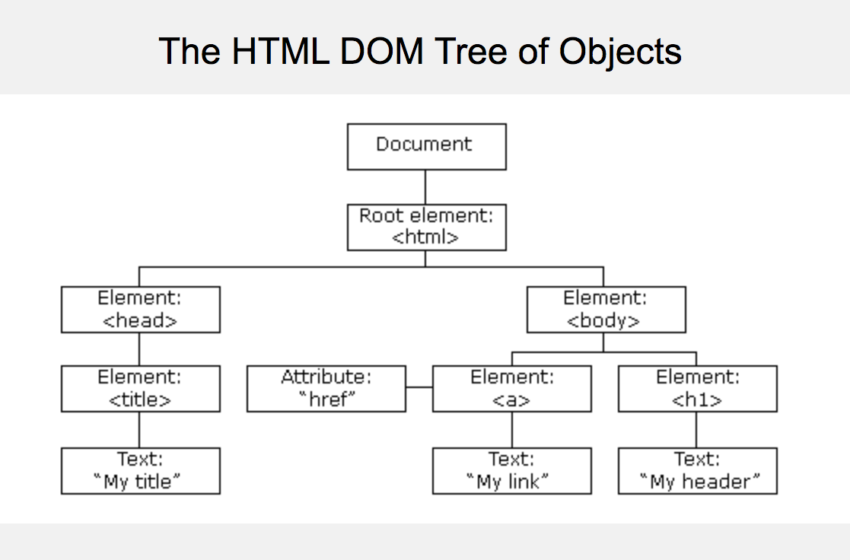
2. DOM(Document Object Model) : Whenever we visit any website page, the browser creates a Document object model for the page. The browser that we use to view the website is a program that interprets HTML and CSS and renders the style, content, and structure into the page that you see. This is constructed/represented as a tree of objects. This DOM could update any element on the page by accessing this document.

3. Variable Declaration: We can use let, var, const for variable declaration in Javascript. Always use let and const for variable declaration. Do remember we can assign objects and functions to variables, unlike other programming languages.
Ex: let myName=’SfdcLightning’; // We can change the value of myName whenever required in the code
let account = new Account(); // We can change the value of Account whenever required in the code
const value =5; // This value is Permanent and cannot be changed in the code.
const car = new car();//The value of car cannot be changed but we can change the properties inside the car
4. Functions: In JavaScript, everything is an Object. Functions can be assigned to variables, passed into parameters of other functions.
function name(parameter1, parameter2, parameter3) {
//Write any code that needs to be executed
}
Ex: var cal = myCalculation(4, 3); //Cal will give us the value as 12
function myCalculation(a, b) {
return a * b; // Function returns the product of a and b
}
5.JavaScript Data Types: There are different data types that hold Values/Objects.
There are 5 different data types that contains values(String/number/boolean/object/function).
There are also 6 types of objects (Object/Date/Array/String/Number/Boolean).
Two datatypes cannot contain values (null/undefined).
6. this keyword: Learn about this keyword as it differs from Apex in salesforce. There are various scenarios and behavior changes of this keyword unlike in apex where it is confined to the current instance of that particular class. Learn more about the use-cases
In this article, We will try to understand the difference between Quick Action, Publisher Action and Global Actions in Salesforce.
Quick Action: Quick Action is like a Shortcut that could be used to Log Calls or Create a Record or Share Files on Salesforce Mobile App.
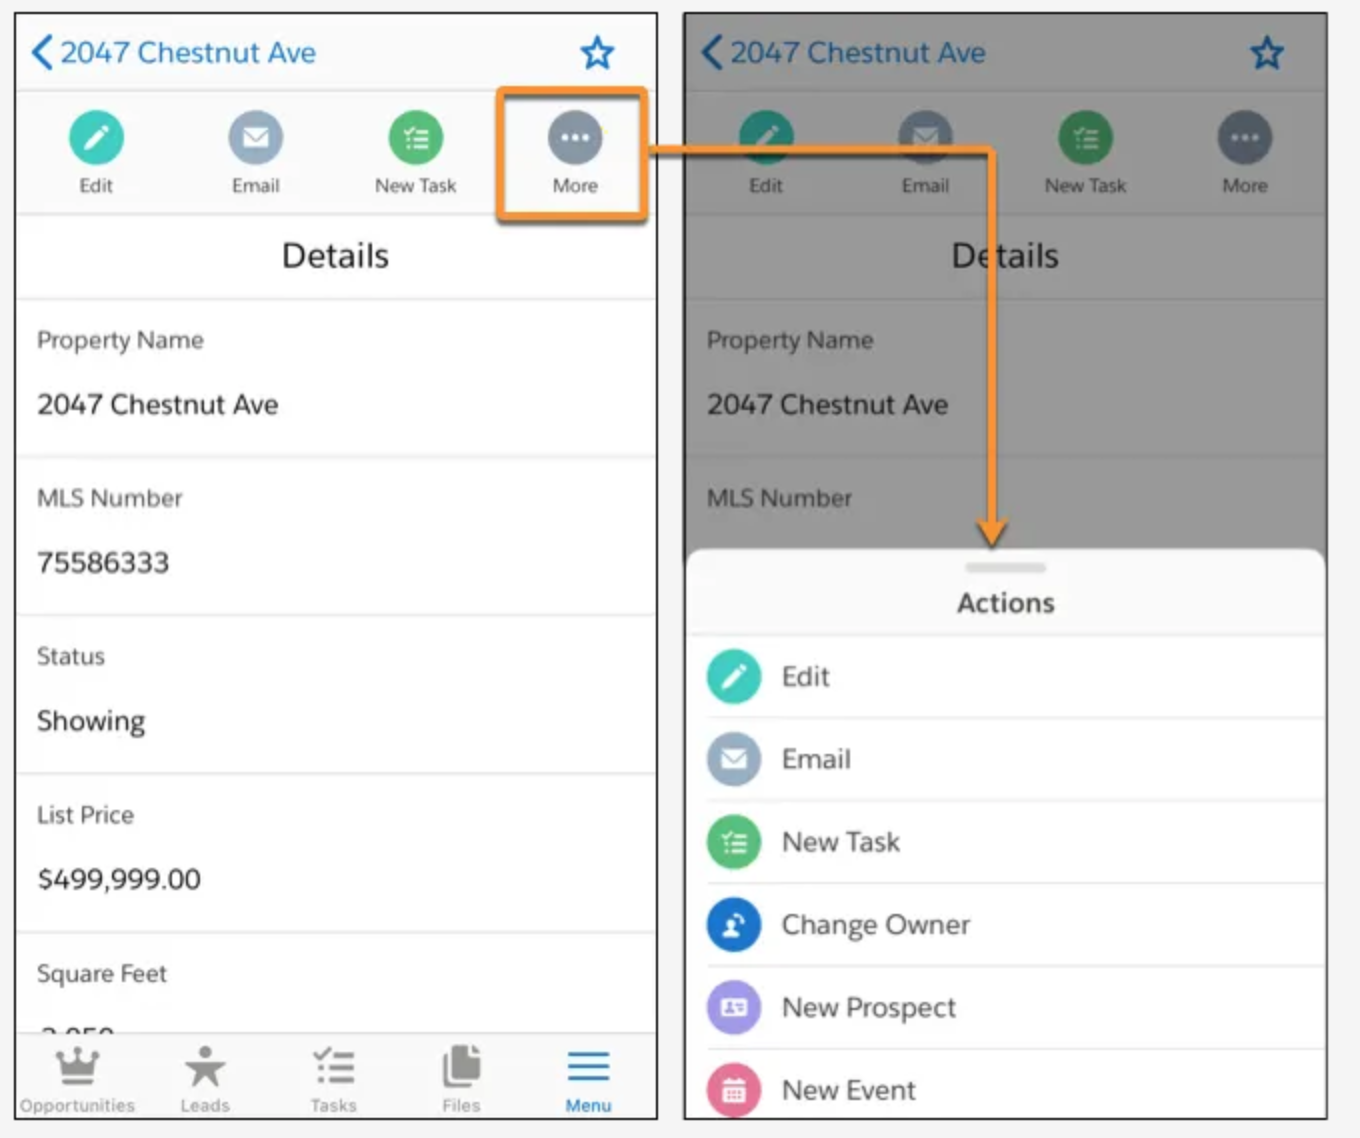
Object Specific Actions: