In this post, We will try to understand how to reset or set a password using Execute Anonymous. At times we want to set or reset a password for some generic users or admin users. We can use System.setpassword() method provided by Salesforce to achieve the desired result from developer console.
Steps to Execute:
Login to Salesforce
Click on setup and Select Developer Console
From Developer console, Navigate to Debug and select Open Execute Anonymous Window
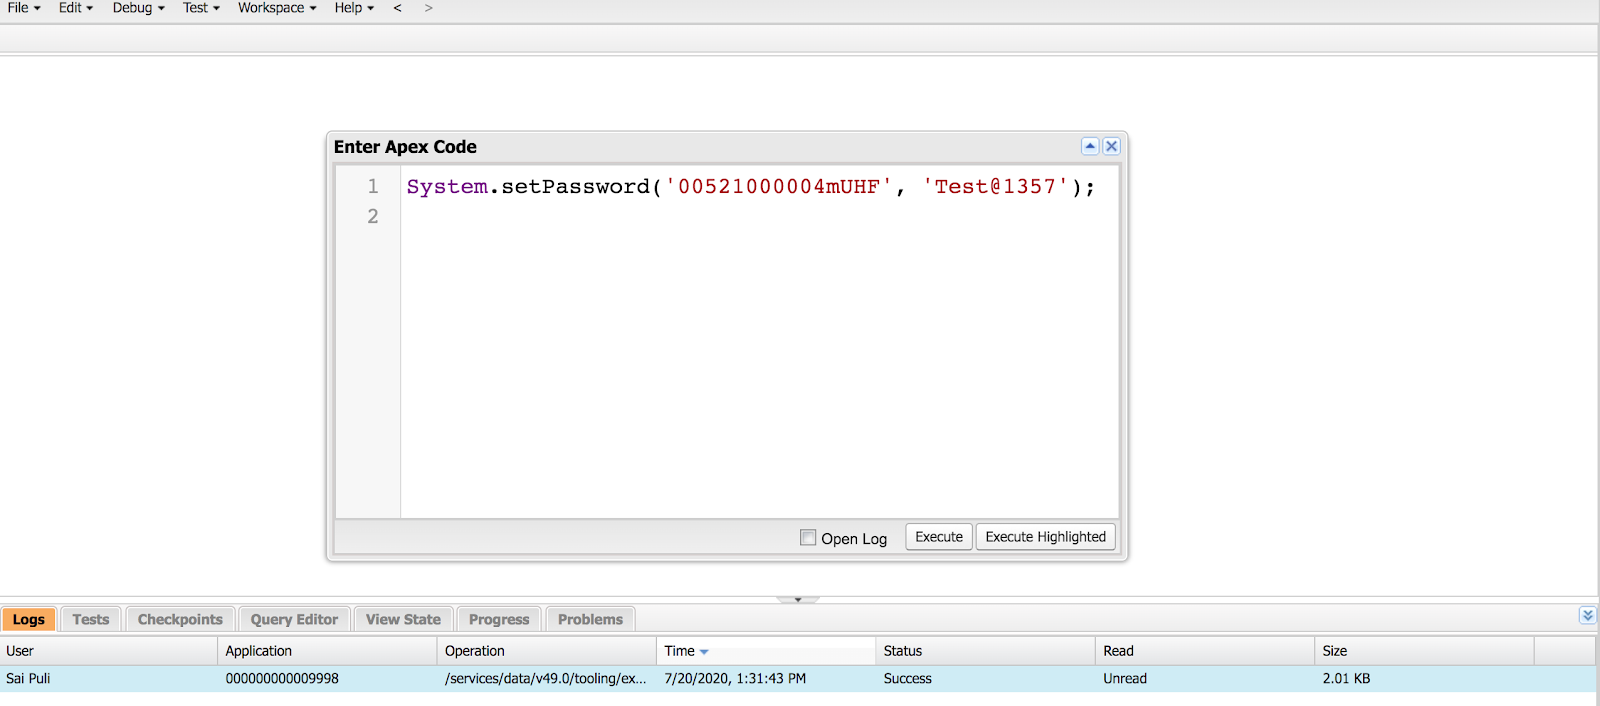
Enter System.setpassword command as shown in the screenshot
Click on Execute
System.setPassword(User,password);
user–Enter the 15 digit or 18 digit userid of the desired user
password — Enter the desired password for the user
Setup–> Developer Console–>Debug –> Open Execute Anonymous Window–>Setpassword method–>Execute
Pro Tip: Developer Console caches your previous settings so once you reset it remove the command from the Developer console and execute it. If someone else ever logs in as you and opens developer console they will see the command and password. For this reason, we want to remove the command from developer console once the password is reset.
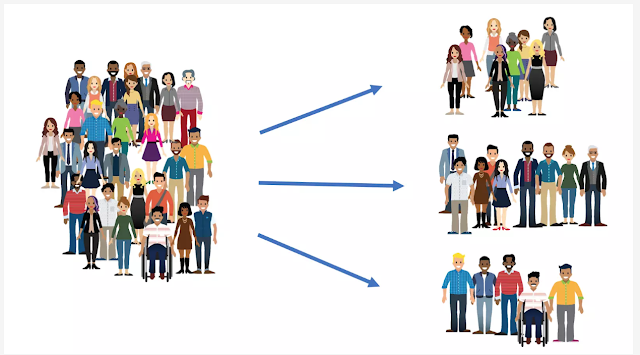
In this article, we will try to understand why do we need segmentation and various ways we can segment data. Segmentation is targeting a desired set of Audiences from all the available Subscribers. For Example, if you want to launch a promotion to existing customers within the age group of 30 to 50 yrs then you could use age as your criteria to send promotional messages only to those customers instead of all the available customers. This would help you to target the right audiences and also help in a fewer number of Unsubscribes or IP Reputation. Segmentation also helps in increasing Higher Conversion rates and also Higher Clickthrough Rates.
Some of the business use cases for Segmentation are:
Segmentation could be done based on Age, Gender, Geolocation, Geographic location to Send personalized marketing messages.
Segmentation could also be done based on Purchase History to show related Products.
You could also filter desired Subscribers based on Personal Interests to promotional events.
The above-mentioned Scenarios are for illustration purposes and you could filter the audience based on any desired criteria.
Segmentation Tools:
Segmenting Lists – Lists hold Subscriber information. Segmenting Lists can be done by using Group and Data filter.
Segmenting Data Extensions – Data extensions can hold subscriber information or Related data. Segmenting Data extension can be done by using queries and Data filters.
In this post, We will try to understand how to iterate over multiple elements in Lightning Web Components using For loop. In general, in order to iterate over a list of elements we use for loop in any programming language(C, C++,Apex) etc. Lightning web components provide us the ability to render a list of items, using for:each directive or the iterator directive to iterate over an array.
When using the for:each directive, use for:item=”currentItem” to access the current item. To assign a key to the first element in the nested template, use the key={uniqueId} directive. When a list changes, the framework uses the key to identify each item so that it can rerender only the item that changed. The key must be a string or a number, it can’t be an object. Assign unique keys to an incoming data set.
This example iterates over an array called employees, which is defined in the component’s JavaScript class.
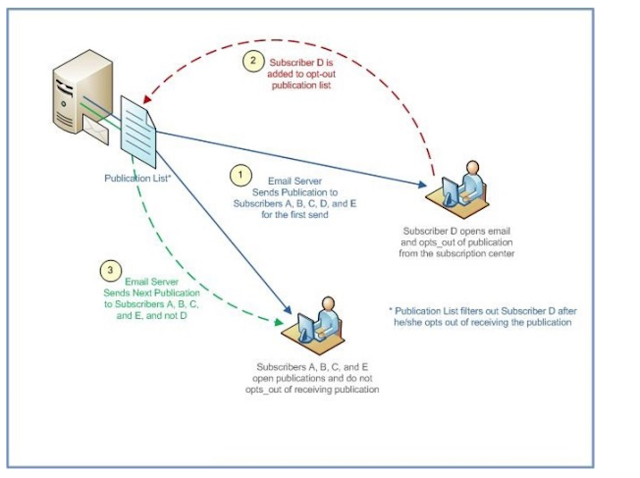
In this article, we will try to explore different use cases for Publication list. Publication list is mostly used for managing Opt-ins or Opt-outs within Email studio. This is also used to control how Subscriber receives different sends such as Emails or SMS based on different categories. We could associate each category with each publication list and make sure Customers/Prospect/Subscriber receives emails from the interested category rather than receiving all the emails. Publication List also helps subscribers in opting out of unwanted categories without opting out of all messages from your organization.
For example, a Customer/Prospect/Subscriber receives a wide category of emails such as Marketing emails, News Letters and Service Notifications. If a customer does not want Marketing emails but wanted to receive News Letters and Service Notifications we could use different Publication lists to achieve this outcome.
If you use only one publication list for all of Subscriber communications and if that person opts out of one publication then that subscriber will be opted out automatically from all publications.
Additionally,
Use a publication list to filter the audience of an email send, which ensure your publications are sent to the subscribers who want to see them.
Use a publication list to show and adhere to regulatory compliance to CAN-SPAM laws.
Use a publication list for each communication type, Such as newsletter, Weather alerts, and Coupons
Use a publication list to control who receives particular communications from a company. In Enterprise 2.0, publication lists can be shared between parent and child business units.
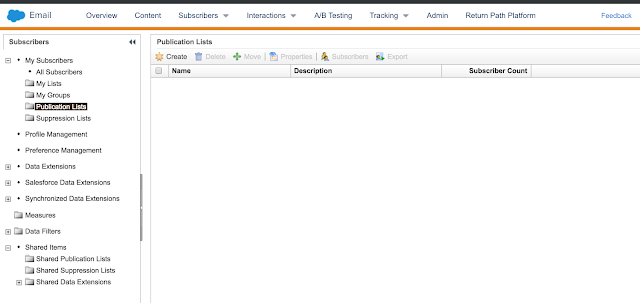
Creation of Publication List:
Publication list could be created by Navigating to Email studio and clicking on the Subscribers tab. Select All Subscribers and click on publication lists.
Navigation: Email Studio –> Email –> Subscribers –> All Subscribers –> Publication Lists
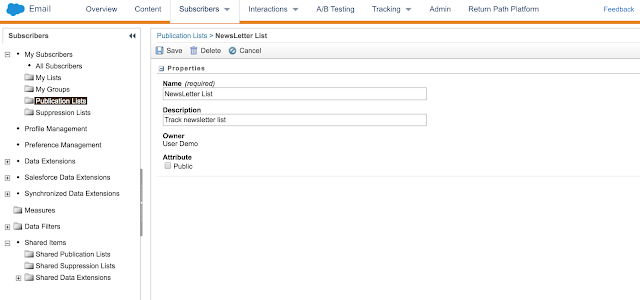
Click on Create and enter Name and description and click on Save.
You could also select a public checkbox if you want to display it in the Subscription center.
In this article, we will try to understand the difference between Lists and Data Extensions. We will also create Sample Lists and Data Extension to understand the navigation and creation process.
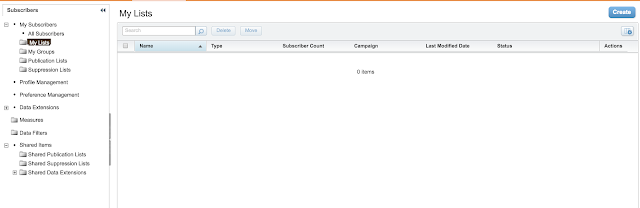
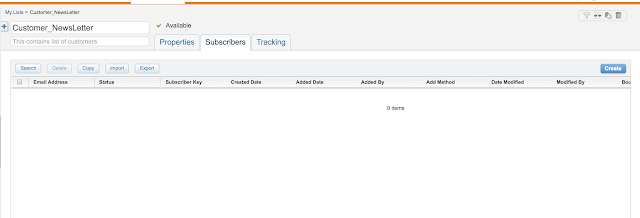
Lists: List is a collection of Subscribers(Customers/Prospects/etc) that receives information from your organization.
We can create as many lists as we want based on different marketing requirements/needs. For Example, we could create a list to send newsletters to your existing subscribers(Customer/Prospects/etc). You could also create/maintain a new list to send Coupons to Subscribers based on different criteria/segmentation. Typically these list contains attributes such as Name, Address, birthday, Interest, other custom attributes. We could also maintain or create lists with subscribers based on channels such as Social Media, Physical Mail or Mobile.
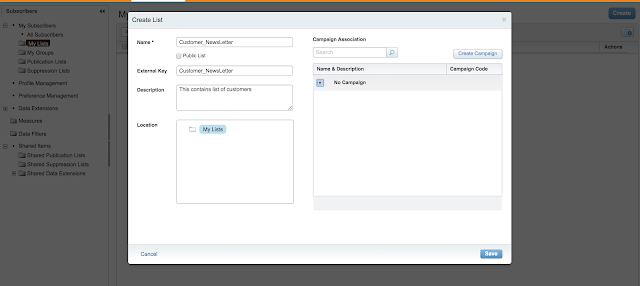
Click on create on the upper right corner and click on Save.
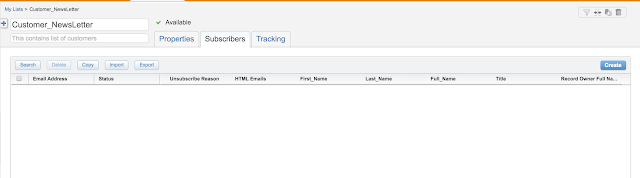
It automatically creates some of the standard attributes such as Email Address, Status, Subscriber key, First_Name, Last_Name, Full_Name, Title, Owner, Record Owner Full Name.
We could also add custom fields to the Lists by click on create.
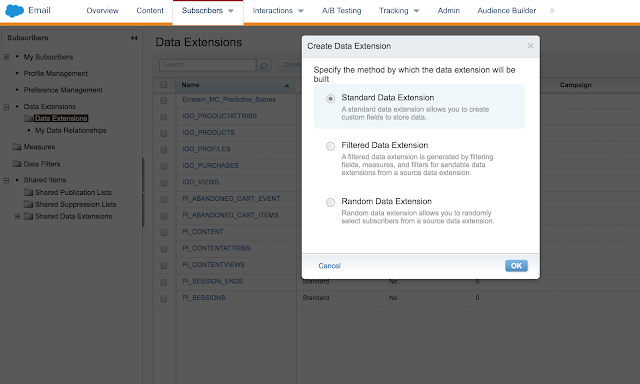
Data Extension: Data extension is like a table with different columns that can hold data in rows. You could use this data extension to store Subscriber information or related information(References of Subscriber information such as Purchase History/Visitor History/Non-Subscriber data) that will be used for sending emails. You have to mark it as Sendable in order to send emails from Data extensions. In general, we will not mark the sendable option to true if you do not want to send emails from data extension or just want to stage the related information of the Subscriber.
There are broadly three other data extensions that could be used on a scenario basis.
Standard Data Extension – A standard data extension allows you to create custom fields to store data. This can act as a standalone data extension with desired fields either to capture the data or use it as a sendable data extension.
Filtered Data Extension – A filtered data extension is generated by filtering fields, measures, and filters for sendable data extension from a Source data extension. This is mostly used when we want to have a different sendable data extension populated with final data that is used for sending emails.
Random Data Extension – A random data extension allows you to randomly select subscribers from a Source data extension. This data extension is mostly used to have a separate sendable data extension that is used for sending emails to random subscribers.
Navigation: Email Studio –> Email –> Subscribers –>Data Extensions
Difference between Lists vs Data Extension:
Lists should be used when the overall Subscriber count is less than or equal to 500000. Data extension doesn’t have any predefined limit on the number of Subscribers or records that it could hold. Data Extension is Scalable and if you are unsure about Subscriber counts for future then its better to use Data Extension upfront.
Importing into lists is slow and it takes time to import Subscribers into Lists. Import process in Data extension is way faster and could load millions of records in less than an hour depending on a number of attributes/columns.
Lists can only hold Subscriber information and cannot be used for storing related information of Subscriber. Data Extensions can hold related information without any limits.
Triggered Sends and SOAP/REST API is supported only in Data extensions but not in Lists.
If you are starting on Marketing Cloud it is better to go with Data Extensions instead of Lists as Data grows over a period of time and all the aspects that work with Lists also work with Data Extension.
In this article, we will try to understand how to copy data from one Data extension to other Data Extension. Sometimes there will be scenarios where you want to change a field type or set a primary key on existing data extension with data. The only option in those scenarios is to drop the existing data and then update the field or set the primary key.
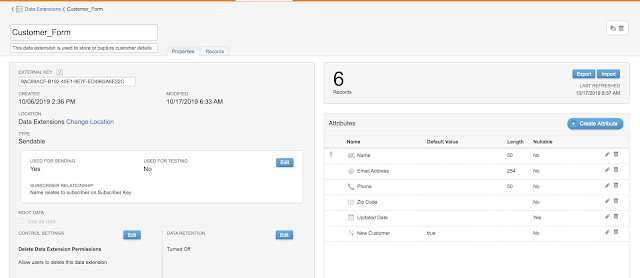
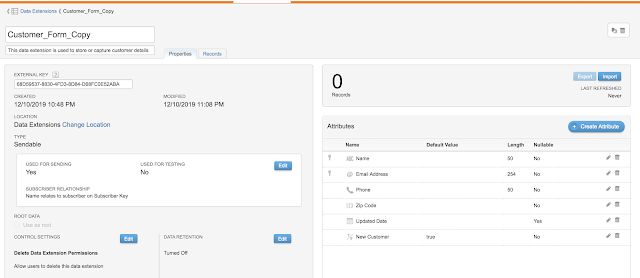
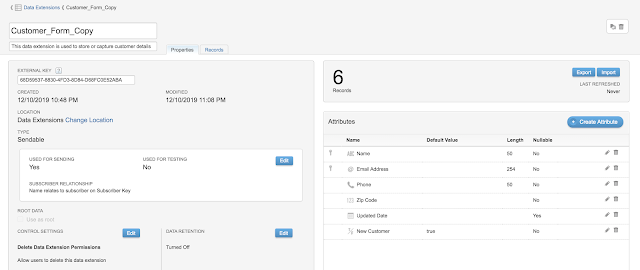
For this demo, I am using Customer_Form Data extension which has only 6 records. We want to change the primary key from Name to Email Address and since the data has been populated we cannot change that until we drop the data. When the volume is less it is easier to do export the data and reimport the file which is less than 20 mb.
Click on Clone on right-hand side top corner next to delete button in order to clone the data extension. This will automatically clone the fields with similar data types and populate the new data extension with Customer_Form_copy(Data extension name_copy).
Click on Save to see the Data extension populated with Similar fields from original data extension without any data. I also added Primary key to Email address after cloning the data extension.
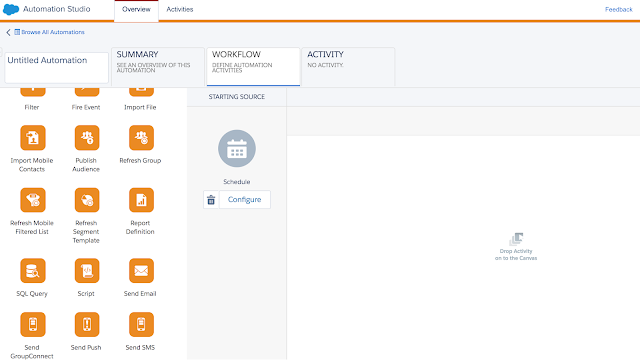
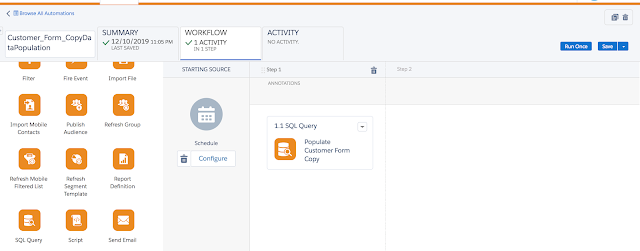
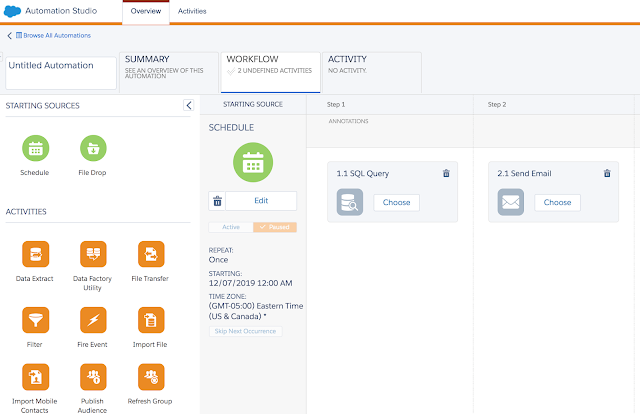
In order to populate data from one data extension to other data extension, we can use SQL query in the Automation studio and schedule the job to run immediately or hourly or daily.
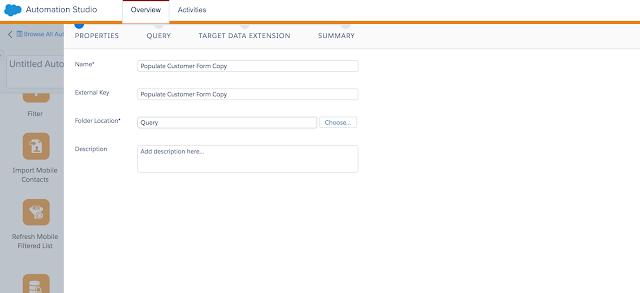
Drag the SQL Query from the palette on the left side and configure the properties by providing desired details such as Name/External Key/Folder Location/ Description.
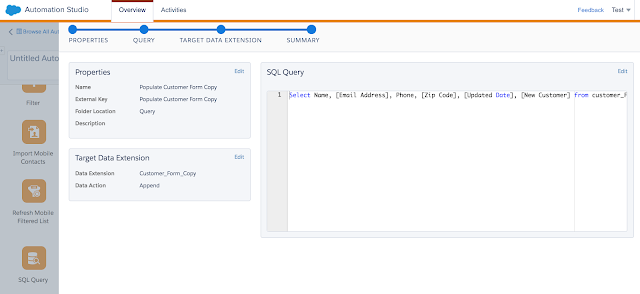
Click on Next at the bottom and select desired data extension and populate/select desired fields in the query.
Select the desired Target data extension(Customer_Form_Copy) and desired Data action(Append/Update/Override).
Click Finish and you will be redirected to the initial Automation page. Once you click on save it will give you the ability to run once or click on configure to run on desired schedule
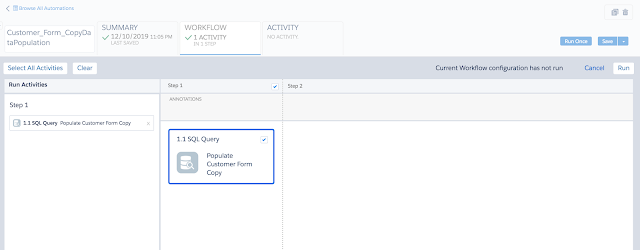
Click on Run once and you will be redirected to below screen. MC Team wants to make sure you haven’t accidentally click on run button so they would ask you to click on run button one more time in below screen.
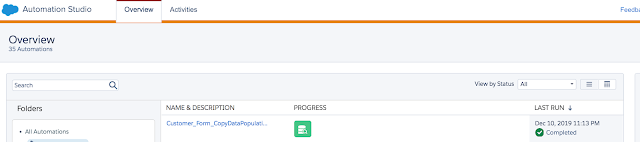
After click on run we can see the results on the overview page of Automation studio as shown below.
Lets validate if our customer_Form_copy data extension is populated with desired records by navigating to Data extensions from Contact builder or Email studio.
We have successfully populated Customer_Form_Copy data extension with data by using SQL Query in Automation studio from Customer_Form data extension. Now we could delete the Customer_Form data extension and rename the existing Customer_Form_Copy data extension to Customer_Form data extension.
In this article, we will try to configure Synchronized data extensions into the Marketing Cloud. This is the first step after installing the Salesforce Marketing cloud connect in your Sales cloud/service cloud. Salesforce Marketing Cloud connect is unidirectional sync that loads data from Salescloud /service cloud to the Marketing Cloud. Standard/custom objects that are loaded into the Marketing cloud appear in synchronized data extensions.
As part of this demo, Let us sync Leads from Sales Cloud to Marketing Cloud. Log in to the Marketing cloud and Navigate to Audience Builder and then select the Contact builder from the dropdown.
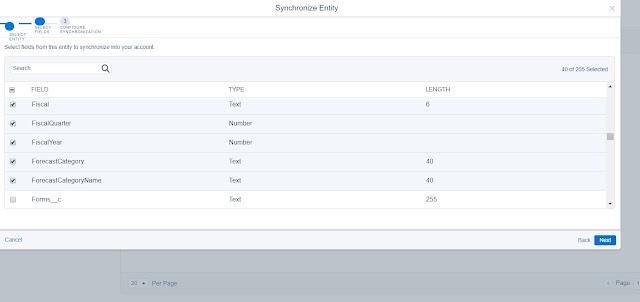
In the contact builder, select the Data Sources tab and click on Synchronized. Select Setup object on the top right corner and select the desired object.
After selecting the desired object then Select the desired fields to be synced. Some of the standard fields like Id, Record Id will be auto-selected and cannot be deselected.
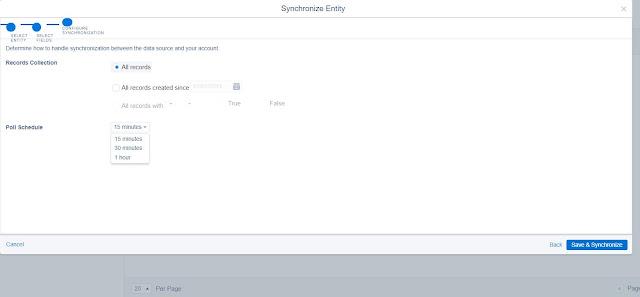
After selecting desired fields then click on Next to Select Record Collection Options and Poll Schedule. From the Records, collection Select All records to sync all records or select All records created since a particular date or Sync based on Checkbox field or Boolean field. You may not see a checkbox field until you select that field as part of the sync field in your previous step. Also, select the desired Poll Schedule(15 mins/30mins/60 mins) to pull records from Sales Cloud to Marketing Cloud.
Frequently Asked Questions:
Can we change our filter criteria to Sync records from Sales cloud to the marketing cloud after the Initial setup?
Ans. Yes, you can go back and modify your filter criteria to sync records.
Can we add or remove desired fields after initial Sync?
Ans. Yes you can add or remove fields after the initial sync
What will be the synchronized data extension name of Contact after the Sync?
Ans. You will see it as Contact_salesforce as the synchronized data extension name
We have multiple Business Units and connected dev to one of the Business Unit and Production to other Business Unit. What will be my synchronized data extension names?
Ans. If you have multiple Business units and connected Marketing cloud connect to your dev and production then you will see Contact_Salesforce in your Business unit that connected to MC first and Contact_salesforce_1 in other business units that were connected later. Since you have one Marketing cloud with multiple BU’s, the marketing cloud will create a unique name/synchronized Data extension name. It is better to Sync objects in production first rather than Dev.
We want to delete Synchronized data extension as it is no longer required?
Ans. You cannot delete the synchronized data extension once it is setup. You can pause the data extension and data will not flow from the Sales Cloud to the Marketing cloud thereafter.
What is the poll schedule to pull records into Marketing Cloud
Ans. You can select every 15 mins /30 mins/1 hour as a poll schedule to sync records from Sales Cloud to Marketing cloud
Can we delete records from Synchronized data extension?
Ans. No, you cannot delete records loaded from the Synchronized data extension
We are unable to Sync campaign members from Sales Cloud to the Marketing cloud?
Ans. There are object dependencies before selecting Junction objects. We need to select/Sync Contact object and Lead Object before Syncing Campaign Member object.
We are unable to see filter/load data based on the Boolean field?
Ans. Select the Boolean field in the list of fields to be synced before filtering records based on the Boolean field.
What happens when we disconnect Synchronized Data Sources?
Ans. Synchronized Data sources remove all Synchronized data extensions, contacts attribute group and Synchronized data source. All the data gets deleted as well.
In this article, We will try to understand different types of Data Extensions and deep dive into each type of data extension. Data extensions are a placeholder to hold data with various columns and it is more similar to Excel sheet/Table with different columns that can hold data in rows.
Different types of Data extensions:
Data Extension(Standard/Filtered/Random)
Synchronized Data Extension
Salesforce Data Extension
Data Extension: As discussed earlier data extension is like a table with different columns that can hold data in rows. You could use this data extension to store Subscriber information or related information that will be used for sending emails. You have to mark it as Sendable in order to send emails from Data extensions. There are broadly three other data extensions that could be used on a scenario basis.
Standard Data Extension – A standard data extension allows you to create custom fields to store data. This can act as a standalone data extension with desired fields either to capture the data or use it to as a sendable data extension.
Filtered Data Extension – A filtered data extension is generated by filtering fields, measures, and filters for sendable data extension from a Source data extension. This is mostly used when we want to have a different sendable data extension populated with final data that is used for sending emails.
Random Data Extension – A random data extension allows you to randomly select subscribers from a Source data extension. This data extension is mostly used to have a separate sendable data extension that is used for sending emails to random subscribers.
Navigation: Email Studio –> Email –> Subscribers –> Data Extensions
Synchronized Data Extension: This data extension is mainly used to populate Salesforce Standard/custom object data from Sales cloud/service cloud into Marketing cloud. We should integrate Salescloud with Marketing cloud using Marketing cloud connect (https://trailhead.salesforce.com/en/content/learn/modules/marketing-cloud-connect/get-started-with-mc-connect) before creating Syncrhonized Data extension. You can add desired columns to Syncrhonized Data extension in Marketing cloud to sync only desired data from Sales/service cloud to Marketing cloud. You could filter out data based on the boolean field before Syncing data from Sales/Service cloud to Marketing Cloud. You cannot manually add records to Synchronized data extension. Synchronized data extensions are automatically added to your data model in the contact builder. Currently, Marketing cloud doesn’t allow this data extension to be sendable and we have to build a separate data extension(sendable) in order to send emails to customers/prospects/Subscribers. We cannot use Synchronized data extensions to write back from Marketing cloud to Sales cloud. This is used for unidirectional sync(Sales cloud to Marketing cloud).
In this post, We will try to learn to set up JEST unit Testing Framework for Lightning Web Components.
What is Jest ?
Jest is a powerful tool with rich features for writing JavaScript tests. Jest can collect code coverage information and supports mocking to help isolate tests from complex dependencies. Jest tests don’t run in a browser or connect to an org, so they run fast. Use Jest to write unit tests for all your Lightning web components. To run Jest tests for Lightning web components, you need the @salesforce/sfdx-lwc-jest Node module in your Salesforce DX project.
Installing SFDX-Jest
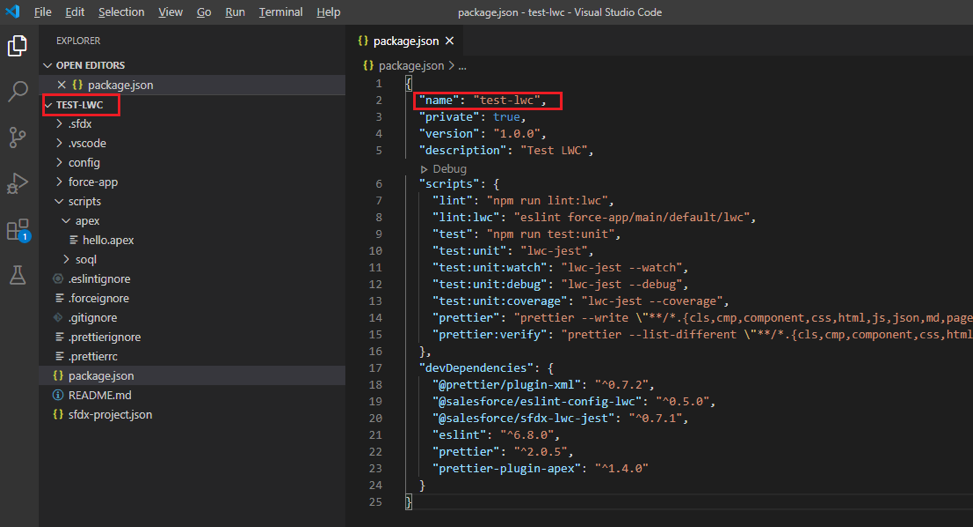
The following JSON is an example of the package.json . Before running the Jest installation setup command from the VSCode Terminal or the node module installation script please ensure that this json file is part of the VSCode SFDX project. The reason I say this is because this json file is parsed when the node module installation script is executed in a MS Windows OS based system.
Note:Always ensure the name attribute on the json matches the project folder name as seen on the Project Explorer in VSCode.
Before issuing the node based scripts, we need to ensure NodeJS is installed in our PC/Laptop. For this ensure you have NodeJS installation done by downloading the Windows equivalent installation file from NodeJs website. For Mac/Linux we can install the same through the terminals directly.
Once you are sure that NodeJS has been successfully installed, issuing the command sfdx force:lightning:lwc:test:setup on the VSCode terminal will result in a couple of warning deprecated details from npm. At times, in some Windows OS based machines we will get an error when this command is executed stating due to vulnerabilities it was not possible to complete the package installation in Windows based machines entirely. However, the screenshot does show that test setup got completed with vulnerabilities observed.
You can also run the script directly from where it was installed in the project using the following Node command. In the Visual Studio Code terminal, in the top-level directory of the Salesforce DX project, enter the following command.
Doing this will setup the node_modules directory locally in the project directory wherever this node modules script is being executed.
While issuing the sfdx command in some of the SFDX projects the absence of the package.json file can result in the sfdx command sfdx force:lightning:lwc:test:setup failing. The error message would signify something like this:
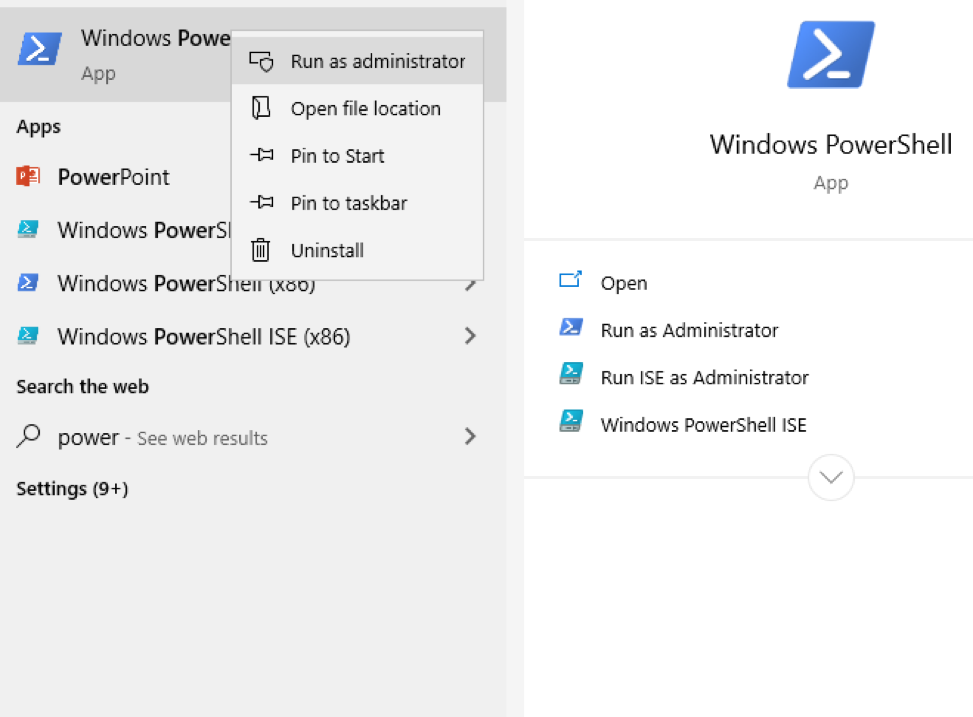
Sometimes we may need to run the following commands in the destined order as mentioned below, to ensure lwc-jest gets installed and setup properly on Windows-based machines.
Both the above commands can be run via GiT For Windows Shell or the PowerShell in a Windows based machine. For the above command ensure the PowerShell is run in the Administrator User’s context as follows by clicking on the Start menu button.
This step will ensure that lwc-jest framework has been successfully installed. This issue was faced by me when I was working on the LWC Unit Testing related Salesforce Trailheads. So I thought of covering up this topic on how I managed to fix the issue in this blog.
Automate Test Scripts with Package.json and npm
A goal of having unit tests is to promote developers to write and run them as part of their development and continuous integration process so that bugs are identified and fixed sooner rather than later. Having to remember and type long commands like the one above over and over is counterproductive to your goal. Here’s where automation comes in.
npm has some great out-of-the-box script automation flexibility. Running the install earlier added a series of options to the scripts property of the package.json file at the root of your project.
{
“name”: “test-lwc”,
… “scripts”: {
…
“test:unit”: “sfdx-lwc-jest”,
“test:unit:watch”: “sfdx-lwc-jest –watch”,
“test:unit:debug”: “sfdx-lwc-jest –debug”,
“test:unit:coverage”: “sfdx-lwc-jest –coverage”,
…
},
…}
If you want to run all tests for your project, run this npm command from the base directory of your project.
npm run test:unit
Run Tests Continuously During Development
To run all tests for a single component every time you save changes, change directories to the component directory and run the npm command below that utilizes sfdx-lwc-jest with the –watch parameter. As mentioned above you could also run this from the base of the project and have all tests in the project run for every change. Git needs to be initialized for –watch to work from the command line.
npm run test:unit:watch
With Git initialized, Jest now watches all component files for updates and runs all relevant tests every time it detects a change.
Run Tests in Jest Debug Mode
To run the project’s Jest tests in debug mode, run the npm command below that utilizes sfdx-lwc-jest with the –debug parameter.
npm run test:unit:debug
Run Tests and Display Code Coverage
To see the code coverage of the tests, use the –coverage option below.
In this article, We will look at multiple ways that we can send emails through Marketing Cloud.
User-Initiated Sends or Manual Sends
Triggered Sends or Action based sends
Journey builder Sends
Automation Studio
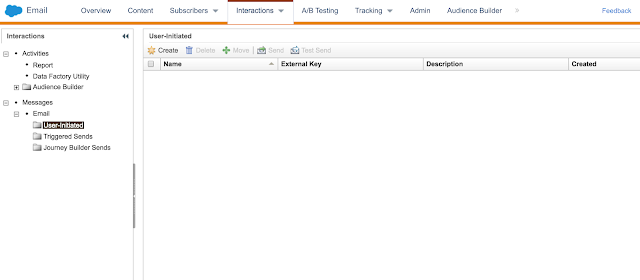
User Initiated Sends: A user-initiated send occurs when the logged-in user sends an email manually. Some of the use-cases pertaining to User-initiated sends are One-off emails to Customers, Testing Campaigns and News Letter Scenarios. In email studio, navigate to Interactions and Select user-Initiated Sends from the drop-down.
Click on Create and provide details such as Name/External key/Description. For the Message field with is a required field kindly select any of the desired email templates from Content Builder/Shared Content/All Shared Content. Selecting Email template should auto populate your desired Subject line or you could populate/overwrite desired subject in the field. You could also select Send to Deliverability send List with desired frequency.Send Classification needs to be set to Default Commercial/Default Transactional based on Organisation needs. You could select desired Recipients from the dropdown and select Data Extension/Lists and also select Exclusion list if any. You could also select Test Lists instead of desired Recipients and select desired Message Properties and User Tracking.
Triggered Sends: A triggered email Send occurs due to an action by customer/prospect/Subscriber. Some of the use cases pertaining Triggered sends are sending a Thank you email on Form completion/submission. Triggered sends can also be caused by SOAP Api. Detailed documentation about Triggered send interaction is available on the official site.
Other ways to send emails from Marketing cloud include Journey Builder and Automation Studio.
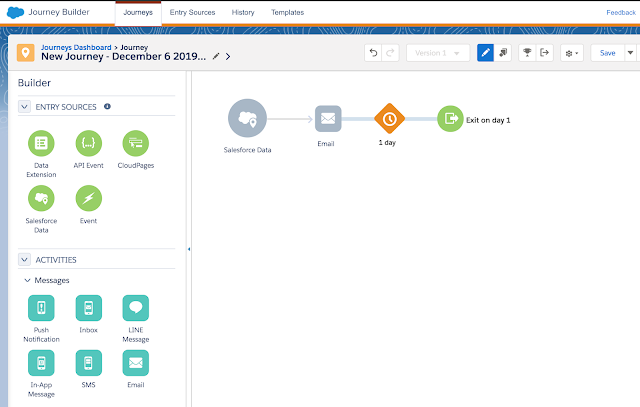
Journey Builder: You can manually launch the Journey or have a schedule to send emails from the Journey by looking at Journey Data extension/API event/Cloud page/Salesforce Data with the desired Schedule.
Automation Studio: You can use Automation studio to send emails from Marketing cloud on an hourly/daily/weekly/monthly basis.