In this post, We will try to understand how to stop users from logging into Salesforce when deployments are going on. Have you ever wondered how salesforce displays a maintenance message to users? The answer to this question is Salesforce uses Login flows to display message to users. Lets see how we could use Login flows, Flows and Custom settings(Hierarchical) together to stop users from Logging into Salesforce during deployments.
Step 1: Creation of Custom settings
Create Custom settings with the desired name and for our demo purpose, we will call it Block users from Login. We need to create two fields (BlockUser and DisplayMessage) on the “Block users from Login” custom settings. Block user field will be a checkbox and the Display Message will be a text area field. If the checkbox is selected then the desired message from the Display Message field should be displayed to the users
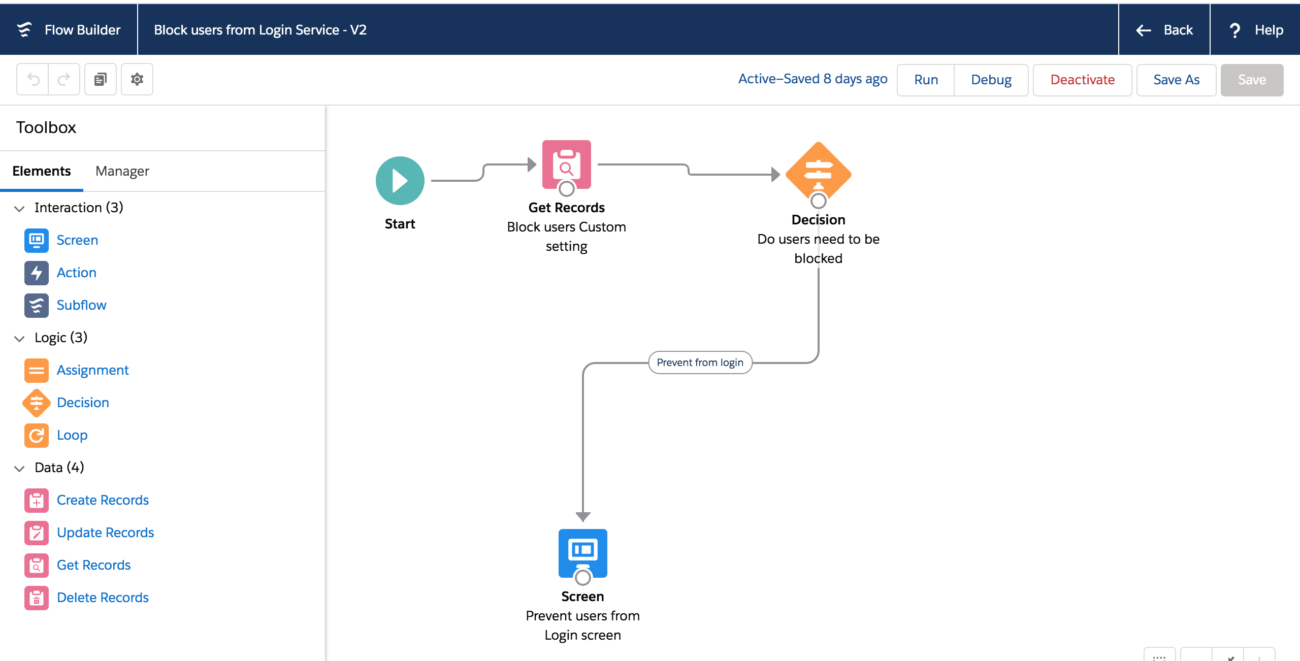
Step 2: Creation of flow
Create a flow with the desired name. For demo purposes, we will call it as “Block users from Login Service”.
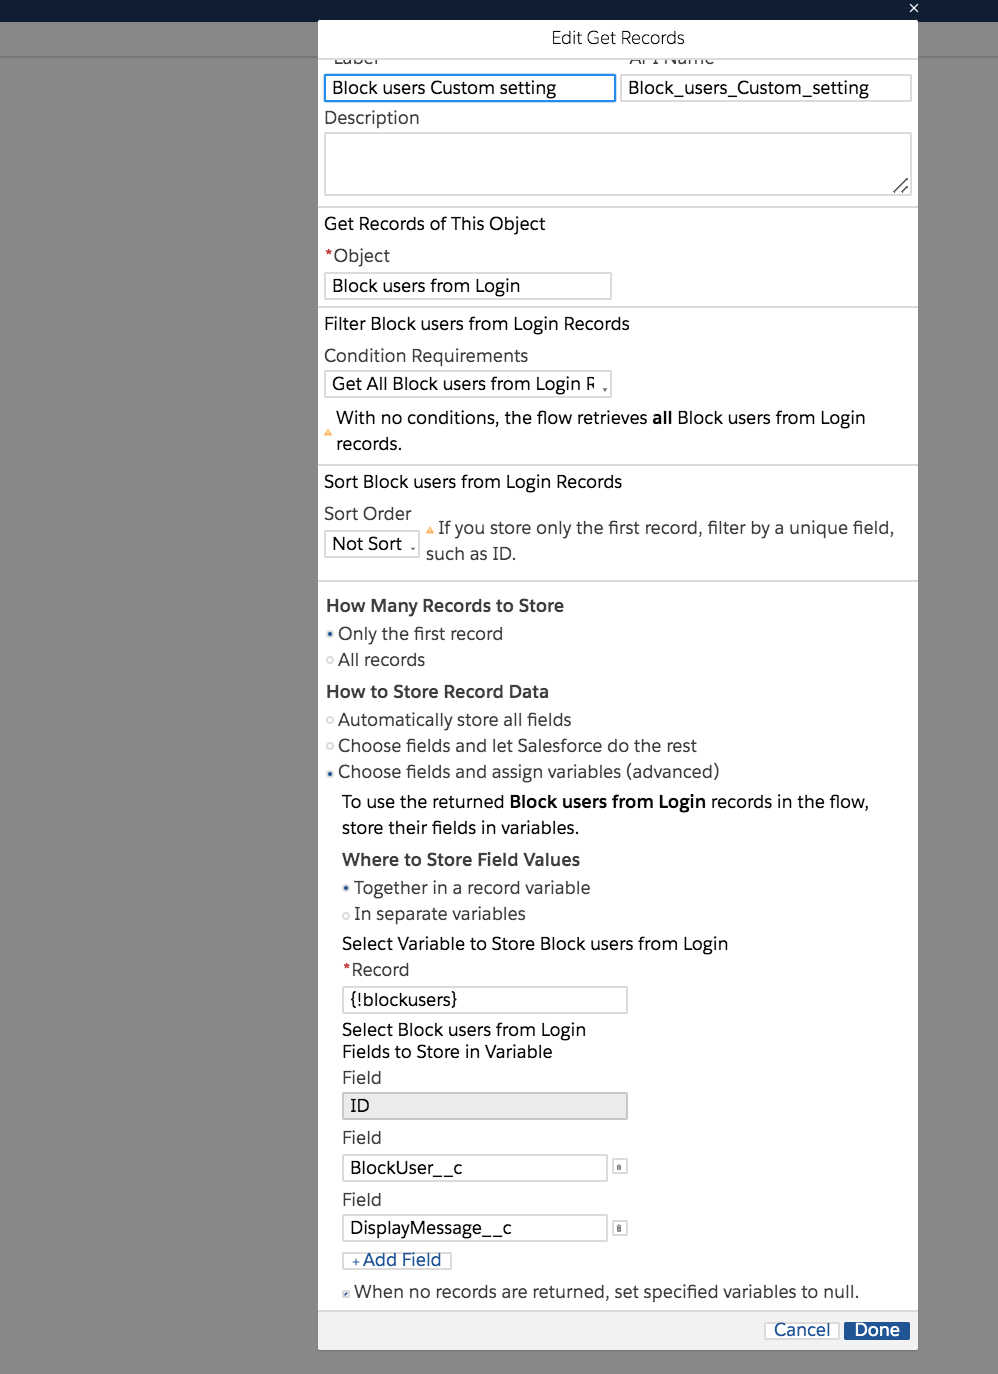
Get Records: From Left side, pane select Get records and drop it on to the main page. In this step, we are trying to get the records from our custom settings(Block users from Login) as shown in the image. Fill in all the mandatory fields and select the first record
Object – Block users from Login
Condition Requirements — Get all Block users from Login
Sort Order – Not Sort
How many records to store – only the first record
How to store the record data – Choose fields and assign Variables (Advanced)
Select Variable to Store Block users from Login
Record – {!blockusers}
Field – BlockUser__c
Field – DisplayMessage__c
After entering all the above information click on Done. With this activity, we have successfully created Get Records.
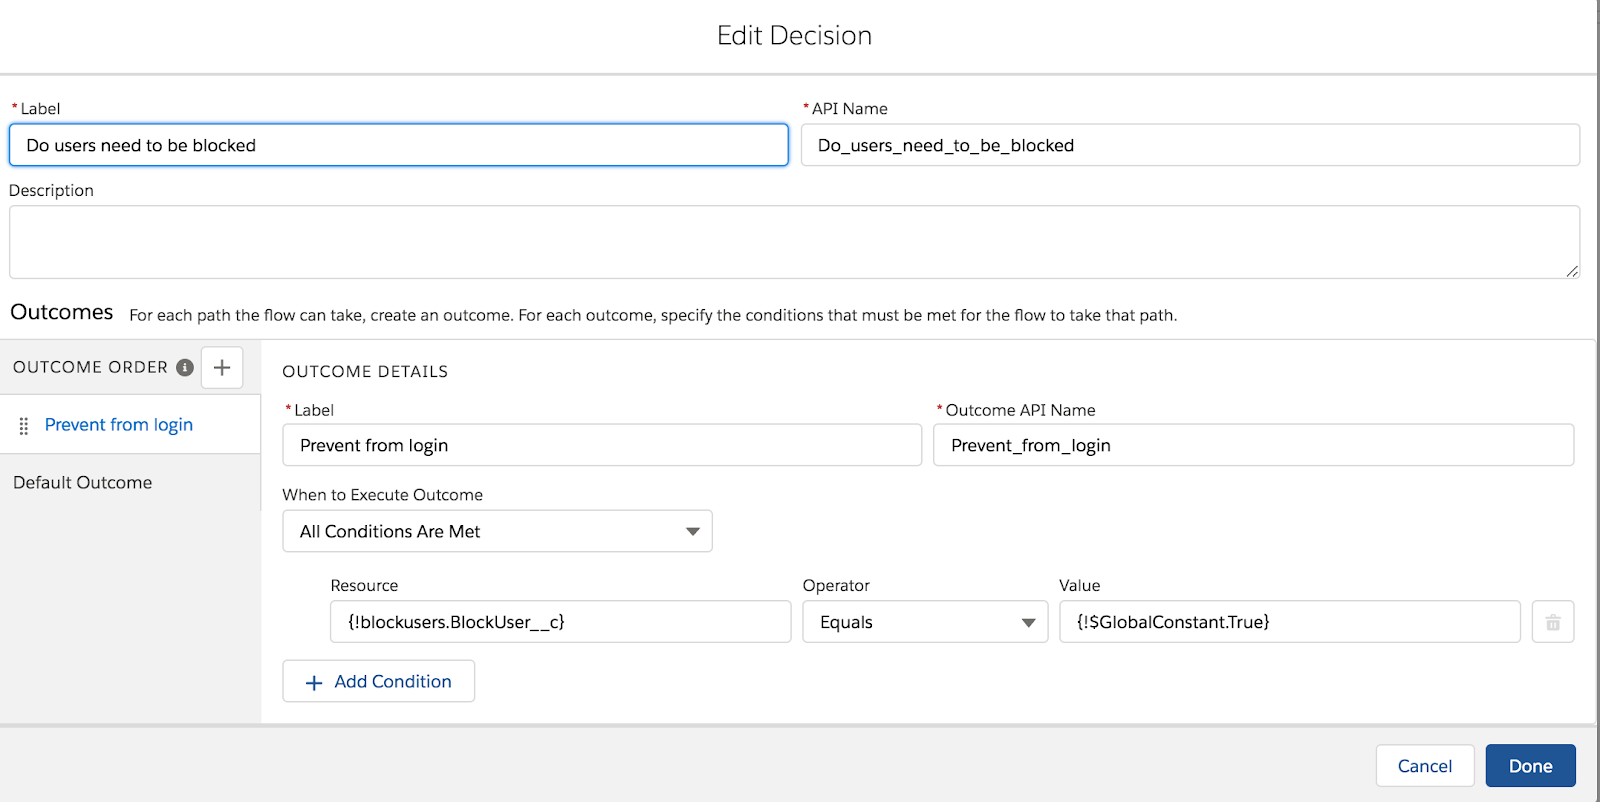
In the next step, we will try to check if the Block user field on the fetched Custom setting(Block users from Login) is set to true using the decision box.
Decision:: Drag and drop Decision box from Left palette onto the Main page.Enter the desired Label and API Name. In the outcome, order click on + and enter the below details. Give the desired Label and API Name and set the When to execute Outcome as “All conditions are Met”. In the Resource select the blockuser field as true using the Global constant field. Click on Save and connect Get Records with decision box.
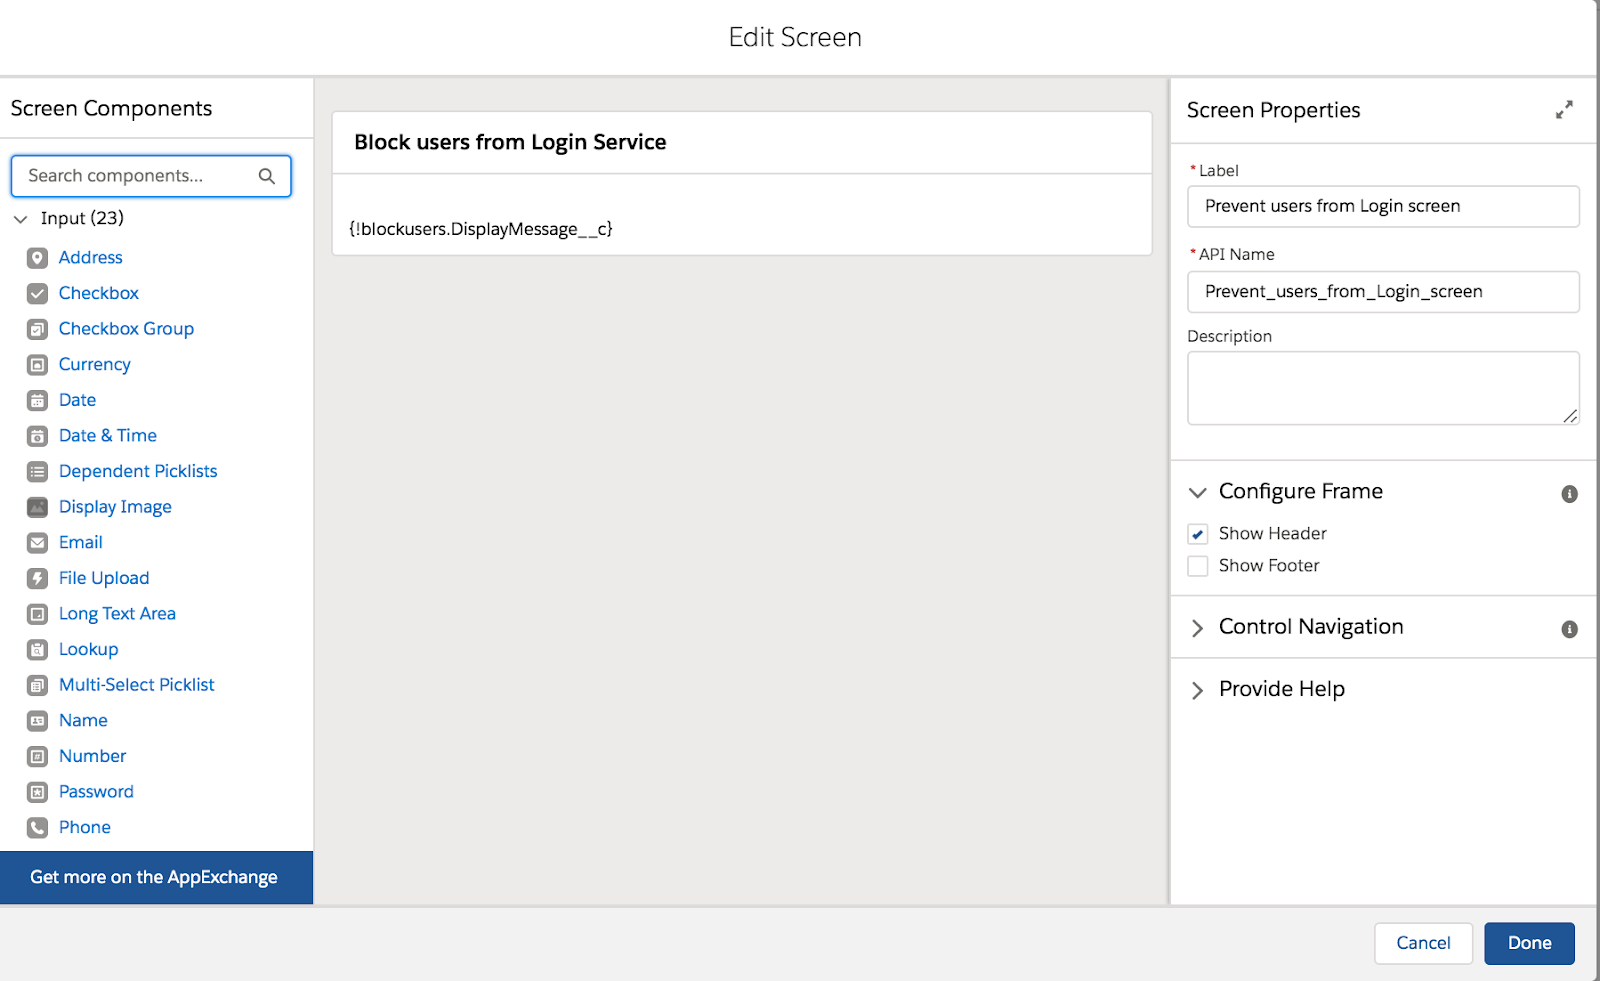
Screen: From the Left palette select the Screen and drop it on the main page. Give the desired screen name on the Label/API Name in the Screen properties. In the configure frame select “Show Header” only.
Note: Make sure you unselect the “Show footer” or else users will be able to see a button and then navigate/login to salesforce.
Our end result of the flow should be as shown below and make sure you go back and activate your flow.
Login flows:
Create new Login flow with desired name and select the flow we have created(Block_users_from_Login_Service). Select userlicense as Salesforce and set the desired profile that we want to block the users from Logging in. In my scenario, I wanted to block Users with Standard User profile from logging into Salesforce.
Testing:
Login with any Standard profile user and we should be able to see the information message from our custom settings and stop users from navigating into salesforce.
Note: Once the deployment/Maintenance is complete make sure to uncheck the Blockuser__c field to allow users into salesforce
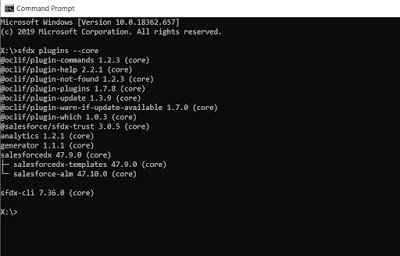
In this article, we will discuss the common errors that are encountered while installing VS Code. There are two steps involved before starting with your first Lightning Web component.
Installing CLI
Download Salesforce CLI using the appropriate link for your operating system:
This is one of the most common errors that most of the user encounters. This could happen because of a couple of reasons.
You might have missed the installation of Salesforce CLI. If so go back and install Salesforce CLI. You can refer the first section of the article for the steps
You might have installed 32-bit version of Salesforce CLI and trying to install a 64-bit version of VS Code. Uninstall 32-bit version of Salesforce CLI and install a 64-bit version of Salesforce CLI. Once the 64-bit Salesforce CLI is installed then go ahead and install a 64-bit version of VS Code.
If you still see the issue after doing the first two steps then check the Path to make sure “Salesforce CLI” is setup in the path.
Go to Window Search–> Type Environment variables–> Open
3. Error: deploying or retrieving source
The file or directory that you tried to deploy or retrieve isn’t in a package directory that’s specified in your sfdx-project.json file. Add this location to your “packageDirectories” value, or deploy or retrieve a different file or directory. For details about sfdx-project.json
This type of error occurs when we do not specify a folder name when we are creating a new project using vscode. To resolve this error create a new folder and use the same folder in VS Code.
4. Error: Unable to load the schema from ‘https://forcedotcom.github.io/schemas/sfdx-project.json/sfdx-project.schema.json’: unable to verify the first certificate.
In order to resolve this error go to your project folder in vs code and select config and replace project-scratch-def.json file with the below code from Github
Please comment on any other errors in the Comment Section below. I will add it to this list so that other members of the community can benefit from your knowledge.
In this article, we will try to understand the Journey builder and different use cases around it. Journey builder helps to define 1 to 1 relationship or personalized Customer/Prospect Journey using multiple channels such as Email, Mobile, PhysicalMail/Direct Mail, and Social Media.
Journey builder Advantages:
We could use the Journey builder to send personalized Emails from Marketing Cloud
We could also connect to the Sales cloud/Service cloud using Journey builder with help of Marketing Cloud Connect.
We could define a customer journey to send Mobile Messages/Push notifications when a customer doesn’t respond to Emails. Additional licence cost is required for Mobile studio.
We could use a journey builder if we want to define multiple touchpoints across the customer journey.
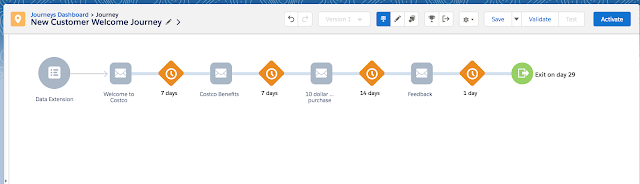
Welcome Email Series for Customer at Costco Use Case:
We could use the Journey builder as part of the Welcome Series and Send multiple emails to customers based on their Journey Path. For example, when a Customer Purchases a new membership at Costco send the first Email Welcoming the Customer to Costco on the day he purchased his membership. Send the Second Email a week later explaining the benefits of Online purchases/Instore promotions that they could use. To encourage customers to visit to the Store send a third email in the third week with an Instore coupon to encourage the purchase. We could also ask them for feedback in week 5 by sending the fourth Email.
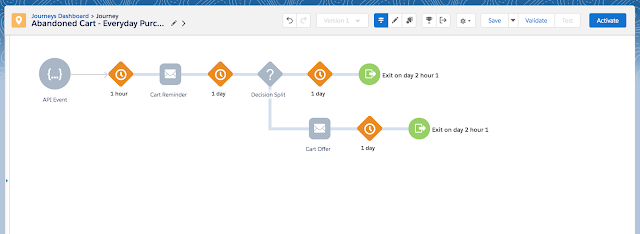
Send a 10 percent coupon based on Abandon cart:
We could utilize Journey builder to Send 10 percent off coupon to the customer/prospect who has abandoned his or her cart. For this, we could use an API event to get the real time data from the Website/e-commerce site and Send an Email with Cart Reminder to the customer. If the customer does not respond within a day we can send a10 percent off coupon to the customer which could help in Increasing Sales.
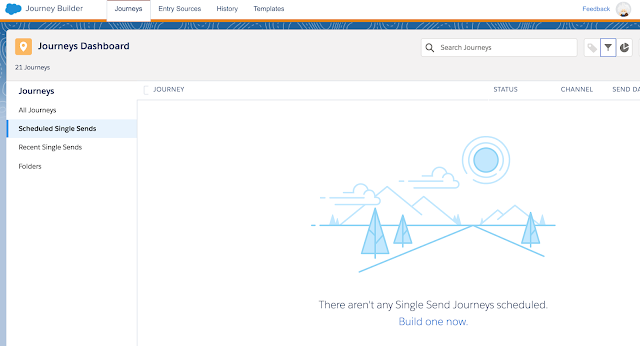
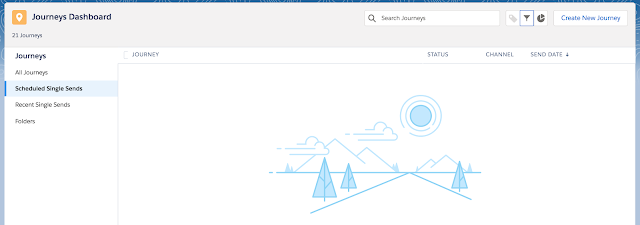
Navigation:
Log in to Marketing cloud and Navigate and click on Journey Builder tab and Select Journey builder.
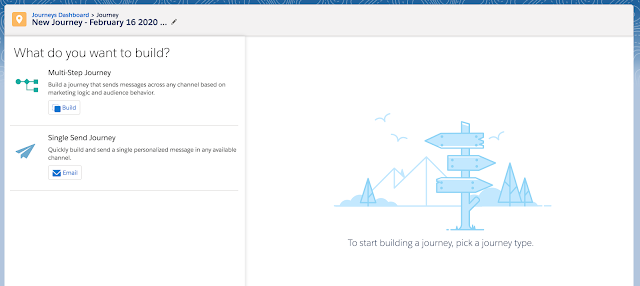
We can create a Journey by clicking on create a new Journey button at top right-hand corner.
We can create a Single Send Journey or Multi-Step Journey by selecting the desired journey.
Click on Build in Multi-Step Journey and it will take you to the below screen.
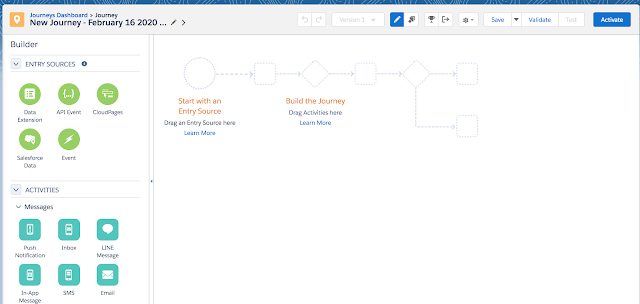
Entry Source:
We could select desired Entry point such as Data Extension or use API Event or Salesforce Data or Event or Cloud Pages with Journey or Customer/Prospect Data.
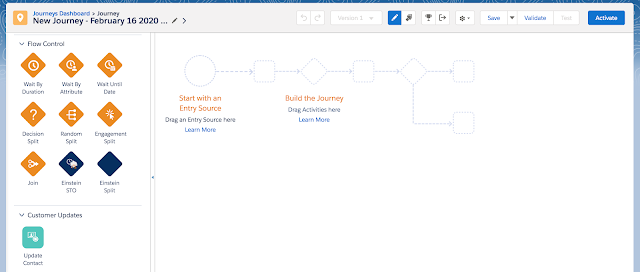
Flow Control:
We could use different wait conditions or decision splits to send customers on different paths.
Activities:
The power of journey builder lies with its delivery using multi-channels. We could use Push Notification/Inbox/Line message/In-App Message/SMS/Email.
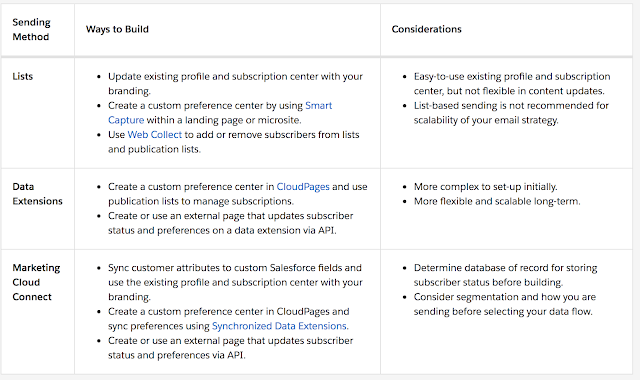
In this article, We will try to understand Custom preference center and also compare it with the Profile Center/Subscription Center to get an overall understanding. Custom Preference Center provides the ability to have both Profile and Subscription information in one page. We can customize the preference center page with desired options that will allow Subscribers to opt-in/opt-out and also provide additional option to Unsubscribe from all the emails. If you are using a Marketing cloud connect then by default we will have to use Custom preference Center.
Ideas to use Preference Center:
You want to provide few options to your Subscribers(Customers/Prospects/etc) such as asking them if they are interested in Getting Emails about birthday Coupons, Networking Events and Promotional Events.
You could also ask customers to opt-in or opt-out into Newsletter, Feedback emails, Conferences, and Events. Since this is a cloud page you could retrieve the preferences from Data extension/Sales cloud and display the subscriber preferences.
You could build custom preference center by using Smart Capture form if you are using Lists. If you are using Data Extensions or Marketing cloud connect then you could use Cloud pages/AmpScript to capture the Subscriber preferences and Update Data Extensions/Sales Cloud /Service Cloud.
Considerations for using Preference Center vs Profile/Subscription Center:
In this article, we will try to get an overall understanding of the Profile Center, Subscription Center and Preference Center in Marketing Cloud. Marketing Cloud provides with out of box functionality in order to Manage its Subscriber(Customer/Prospect/etc) preferences using Profile and Subscription Center.
Profile Center: Marketing Cloud provides the Profile Center Web page where Subscriber can update their basic information and Personal preferences. This applies to Email Marketing only. We can add custom attributes to show available information(First Name/Last Name/Email/etc) or collect additional preference related attributes on the Profile Center.
Navigation: Email Studio –> Email –> Subscribers –> Profile Management
Click on Preview Profile Center
Subscription Center: Subscription Center is a different web page that identifies which messages a Subscriber(Customer/Prospects) can receive from our business. Communications that have been added to a public publication list are displayed in Available publications. Publication lists helping in Opting in/opting out of desired communications instead of opting out from all communications. For example, if a customer wants to opt-out from Weekly deals emails and want to receive Newsletter Emails this could be handled using Publication lists. As a side note you cannot use custom attributes in Subscription Center.
Navigation: Email Studio –> Email –> Subscribers –> Profile Management
Click on Preview Profile Center and select Subscription Center
As part of the CAN-SPAM Act, it is mandatory to have the Unsubscribe option to be part of Email marketing and the out of box profile center and Subscription center provides with such an option with much of hassle.
Note: You can only customize the color scheme and add your logo using Brand Builder but not do much of customization to any of these standard web pages.
In this article, we will try to Cover all the certifications in Marketing Cloud. Salesforce has introduced two new Certifications for Marketing Cloud in 2019 apart from the existing two certifications.
Certifications:
Marketing Cloud Administrator: This is the latest certification that was introduced in Nov 2019 and this certification tests the overall knowledge of the features available to end-users and configuration options available in Marketing Cloud. We Should be able to respond to common business requirements and perform Administrative functions within Marketing cloud in accordance with digital marketing best practices.
Prerequisite: This is a stand-alone certification and does not have any new pre-requisite.
Marketing Cloud Developer: This certification was launched in May 2019 and will assess important development concepts such as AMP Script, SSJS, Data extensions, Import activities, data modeling, and Security. This exam also tests our understanding of important concepts such as Key management types, encryption functions, and required permissions for API,etc.
Prerequisite: We have to hold an active Marketing cloud Email specialist before taking this exam.
Marketing Cloud Consultant: This certification tests the candidates ability to Configure and implement tools effectively in Marketing cloud. This exam also tests the candidate’s ability to provide solutions in executing both tactical and Strategic email Campaigns. This exam is mostly designed for consultants who have hands-on experience implementing Email Studio, Journey Builder, Automation Studio, Content builder, Contact Builder, and Marketing Cloud Connect.
Prerequisite: We have to hold an active Marketing cloud Email specialist before taking this exam.
Marketing Cloud Email Specialist: This is the base certification of all the certifications and tests the candidates ability to demonstrate their knowledge, skills, and experience using a Marketing cloud for message design, subscriber and data management, inbox delivery, and external integrations. We should have a good understanding of utilizing a content systems, segmentation, automation, tracking, and analytics to make data-driven decisions to optimize email campaigns.
Prerequisite: This is a stand-alone certification and does not have any new pre-requisite. This exam is pre-requisite for other certifications such as a Marketing cloud Consultant and Marketing cloud Developer.
Lightning Web Components framework provides us with three decorators that adds functionality to a property or a function. These decorators are unique to Lightning Web Component framework.
There are three types of Decorators
@api
@track
@wire
@api:
If we want to expose a public property then we need to decorate the field with @api. These public properties are reactive and if the value in the public property changes then the component rerenders Automatically. Public methods are part of component’s API. To communicate down the containment Hierarchy, Owner and Parent Components can call JavaScript methods on child Components.
In order to decorate the field, we need to first import @api from lwc.
import { LightningElement, api } from ‘lwc’;
Note: Property names in JavaScript are in camelCase(first word starts in lowercase and first letter of second word will start with Capital letter) while HTML attribute names are in kebab case(all the words are in lowercase and dash-separated) to match HTML standards.
Example::
// todoItem.js
import { LightningElement, api } from ‘lwc’;
export default class TodoItem extends LightningElement {
@api itemName = ‘New Item’;
}
<!– todoItem.html –>
<template>
<div class=”view”>
<label>{itemName}</label>
</div>
</template>
<!– todoApp.html –>
<template>
<div class=”listing”>
<c-todo-item item-name=”Milk”></c-todo-item>
<c-todo-item item-name=”Bread”></c-todo-item>
</div>
</template>
@track:
Track is used for private properties that want to be rerendered on the component. If a field’s value changes and the field is used in a template or in a getter of a property that’s used in a template, the component rerenders and displays the new value.
Note: After Spring 2020 we need not use @track decorator for private properties as salesforce automatically re-renders the component when there is a change to property.
Lightning web components use a reactive wire Service to read salesforce Data. We can invoke apex method from the component using wire service.
To call an Apex method, a Lightning web component can:
Wire a property
Wire a function
Call a method imperatively
To implement @wire decorator, import @salesforce/apex scoped module into JavaScript file.
import apexMethodName from ‘@salesforce/apex/Namespace.Classname.apexMethodReference’;
apexMethodName—An imported symbol that identifies the Apex method.
apexMethodReference—The name of the Apex method to import.
Classname—The name of the Apex class.
Namespace—If the class is in the same namespace as the component, don’t specify a namespace. If the class is in a managed package, specify the namespace of the managed package.
When an Apex class name changes outside of the JavaScript source file, the class name is automatically updated in the JavaScript source file. Method and argument name changes aren’t updated in the JavaScript source file.
To expose an Apex method to a Lightning web component, the method must be static and either global or public. Annotate the method with @AuraEnabled.
In this post, we will try to Design a process using Custom Metadata settings to run the Batch job at desired intervals.
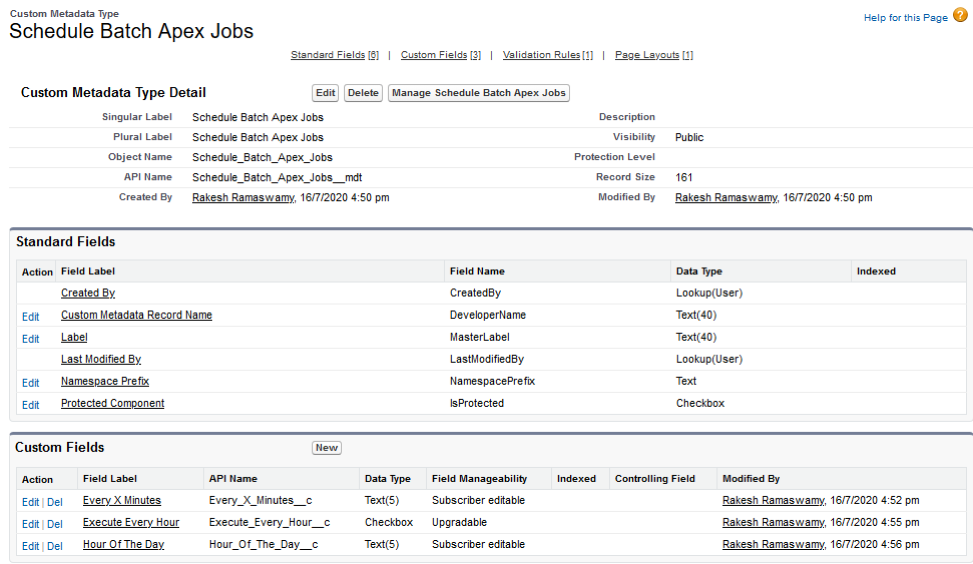
Custom Metadata Type – Schedule Batch Apex Jobs
This Custom Metadata Type is used to define how often the batch jobs must be executed. This custom metadata type can be used in the future for other batch jobs that will be newly developed in the course of the Salesforce Application Development.
As seen in the illustration above, the custom metadata type comprises of 3 custom fields namely:
Every X Minutes (API Name: Every_X_Minutes__c): This is a text field. If defined will ensure the batch job is executed every “X” Usually the value for “X” should be multiples of 5 and less than 60. For Eg: 20, 30, 40, 45.
Execute Every Hour (API Name: Execute_Every_Hour__c): This is a checkbox field. If checked, will ensure the batch job is executed every hour in a day.
Hour Of The Day (API Name: Hour_Of_The_Day__c): This is a text field. If defined will ensure the batch job is executed at the Hour of the day mentioned in this field. The hour should be mentioned in the 24-hour format and the values can range between 0 and 23. For Eg: If the batch must be scheduled to run at 1 PM by the scheduler job, then the hour to be mentioned in this field must be 13. Likewise, if it must be scheduled to run at 4 PM then the hour to be specified in this field must be 16.
Validation Rules on the Custom Metadata Type
The above validation rules can be defined on the Custom Metadata Type in order to ensure that multiple inputs aren’t provided when it comes to the batch scheduling time intervals. The intention for this solution to work is to ensure either the batch is configured to be run every “X” minutes, or every hour or at a specific time in the day. In Salesforce, the CRON Expression for scheduling the same would change every for each parameter that is being set depending on whether the batch has to be executed every “X” minutes or every hour in the day or at a specific time in the day.
Like for E.g.: Batch Job could be executed every hour in a day, or the Batch Apex Job could be executed once everyday at some specific time of the day. However, it is very unlikely that batches can be executed every 5 mins or every 10 mins. There may be possibility that batches would need to be executed ad-hoc typically in ISV product development scenarios. Even in that case it may so be the case that a Lightning or Salesforce Classic based button placed on a Lightning Page or Visualforce Page would be invoking the batch job ad-hoc.
Moreover, the downside or overhead of scheduling batch-jobs to run every 5 mins will result in the batch apex job running at different times as it moreover executes in an asynchronous manner. This can result in wrong outputs or results especially if we are calculating totals as aggregate or for that matter provisioning or revoking permissions in the form of permission-sets or share records.
Setting CRON expression to run batch every ‘X’ Minutes.
As a developer, the idea is to ensure the Scheduler gets the right CRON job expressions each time it must invoke the batch apex job at the regular interval as expected. Always remember that, to execute the batch job every 30 mins the batch job would need to be invoked twice every hour, which technically implies that the scheduler will have to be invoked twice every hour.
With the above invocation, we will observe that the batch job gets scheduled for every 30 mins that is at the 60th minute or 0th minute of every hour and at the 30th minute in an hour. The Invoker class must call the Scheduler class twice so that the batch job gets called from the Scheduler Job.
In the above e.g. if let us say we set the custom metadata type in such a manner that we would like to run the batch job through the Scheduler Job, then in such a case the Scheduler will need to be invoked 5 times i.e. at 0th minute in the hour, 15th minute in the hour, 30th minute in the hour and at the 45th minute in the hour.
public class InvokeScheduler {
public void SchedulerMethod() {
Schedule_Batch_Apex_Jobs__mdt scheduleBatchMDT = [SELECT Every_X_Minutes__c, Execute_Every_Hour__c, Hour_Of_The_Day__c FROM Schedule_Batch_Apex_Jobs__mdt WHERE DeveloperName = ‘Unique Name of the Custom Metadata Type data record‘];
The above class is the invoker class that ensures that several instances of the scheduler are instantiated to run at the specific time in regular intervals. This class is responsible for preparing the CRON expression that will define how often the Scheduler Jobs must be instantiated, which in turn will be responsible for invoking the batch. Before calculating the CRON expression it is important to understand what setup as part of the metadata-type has been configurational settings.
The Interval variable is being used to identify the iterations we need to go through to build on the CRON Expression. CRON_ SubStringList must be a list collection to determine the series in minutes how often the scheduler must be scheduled because the list collection helps us get the string in an ordered manner vs. a set collection because the set is an unordered collection.
Can we call the Scheduler class from the Scheduler class itself (Recursion calls)?
We Cannot do this because the Scheduler goes into an infinite loop of a never-ending state and keeps spawning new processes. Some blogs also suggest to hit the CRONTrigger repository table to find the immediate last scheduler’s Job ID and to abort it. This will not be the actual solution to this problem. This is the very reason it makes sense to control the Scheduler job invocation from an external class, which in this case will be the InvokeScheduler Apex Class.
global class scheduleBatch implements Schedulable {
global static void scheduleMe(String CRON_EXPR) {
System.schedule(‘ Schedule Job – ‘+String.valueOf(Math.abs(Crypto.getRandomLong())).substring(0, 5), CRON_EXPR, new scheduleBatch());
The above Apex class is none other than the actual Scheduler Class that is implementing the Schedulable interface. This class has two methods one is the execute( ) method that runs in the Schedulable Context and the other i.e. scheduleMe() is the static method which is invoked from the InvokeScheduler class, to ensure the scheduler is instantiated dynamically depending upon the no of instance that has to be spawned based on the Custom Metadata Type setup.
In this article, we will try to understand the basics of AmpScript and insert records into Data Extension. In our previous article, we learned how to personalize using Ampscript. Ampscript code starts with %% and ends with %%. For example, if we wanted to get the dynamic value of Email from Data extension we can use %%Email%% on the Email template or on the cloud page. In case of Cloud page if we want to write an ampScript block then it starts with %%[ and ends with ]%%.
%%[
/** Start of Variable Declarations **/
var @newName,@newEmail,@newPhone ,@website,@Submit
/** End of Variable Declarations **/
/** Start of Setting Dynamic/static values to desired variables **/
set @newName = RequestParameter(“name”)
set @newEmail = RequestParameter(“email”)
set @newPhone = RequestParameter(“phone”)
set @website = ‘Home Page’
set @Submit = RequestParameter(‘submit’)
/** End of Setting Dynamic/static values to desired variables **/
/** Validate if the variable has got the desired value before inserting into Data extension **/
In the above code snippet, we have started our ampscript code with %%[ and then we declared variables using var keyword. Every variable must be declared/starts with @. We have declared newName, newEmail, newPhone for demo purposes.
var @newName,@newEmail,@newPhone,@website,@Submit
After declaring the variables the next step is to populate the variables with some values. We can set any value to the variable as it can hold text or numbers. In our scenario, we want to collect all the dynamic values such as name, email, phone and submit from the form which the customer has entered. RequestParameter function in Ampscript helps in getting dynamic values from the form.
set @newName = RequestParameter(“name”)
set @newEmail = RequestParameter(“email”)
set @newPhone = RequestParameter(“phone”)
set @website = ‘Home Page’
set @Submit = RequestParameter(‘submit’)
After the Declaration of variables and setting/getting the values into variables, our next step is to use the variables and send it to data extension.
We always have to do conditional based logic to avoid unnecessary calls/errors to data extensions. To implement conditional logic we can use If condition/If else condition similar to other programming/Scripting languages. The syntax is a little different when compared to other programming/Scripting languages.
If (condition is true) Then
do this
Endif
In our scenario, we are checking if @submit variable is populated with value as submit then insert into data extension
InserDE syntax helps in inserting data into Data Extension. The first parameter takes the data extension name and is a required field. We also need a column name on the Data extension for which the value has to be inserted.
Syntax
InsertDE(1, 2, 3)
Ordinal
Type
Description
1
string
Required
Name of the data extension from which to insert the specified row
In this article, We will try to explore different business use cases to prepopulate a form with existing data of the customer rather than asking the customer to enter the data.
Business Use case: Some of the eCommerce websites pre-populates your email address when you click on unsubscribe. Some of the Telecom companies populate your Landing pages with prepopulated information such as Name, Phone number, and Email.
For this Demo, we have created a Sample form with Name, Email, Phone, Address, and Zip. If you observe closely we have used HTML tags starting with the Form Tag. If you save this code in a cloud page you will observe that a form is created with Name/Email/Phone/Address/Zip fields with a submit button. Customers/Prospects can submit the desired information from this page.
Let us try to pre-populate the form by using %%fieldname%% in the value of the input tag. If you save this code on a cloud page you will observe that a form is created with Name/Email/Phone/Address/Zip fields and you will also see values populated with %%Name%%,%%email%%, %%Address%%.
When you click on a cloud page link you should see something similar in your browser. If you want to test this in action then send a test email from Data extension and click on the button link on the email which takes you to this cloud page which prepopulates the desired data.
Note: Sometimes it may not be a good idea to use pre-population of data especially in a Forward to Friend Scenarios as it will expose the data of the customer to his/her friend.